 ALLPCB


In the world of electronics, protecting your circuits from environmental hazards like moisture, dust, vibration, and mechanical shock is crucial for ensuring long-term reliability. One of the most effective ways to achieve this is through potting, a process also known as encapsulation. If you're searching for how to pot electronic circuits or looking for a detailed resin encapsulation guide, you've come to the right place. This comprehensive tutorial will walk you through the encapsulation process, potting compound application, and circuit board encapsulation techniques, step by step.
Whether you're a hobbyist or a professional engineer, mastering the art of potting electronics can significantly enhance the durability and performance of your projects. In this blog, we'll cover everything from the basics of potting to advanced tips for achieving a flawless finish. Let’s dive into this potting electronics tutorial and explore how you can safeguard your electronic assemblies with ease.
What Is Potting and Why Is It Important for Electronic Circuits?
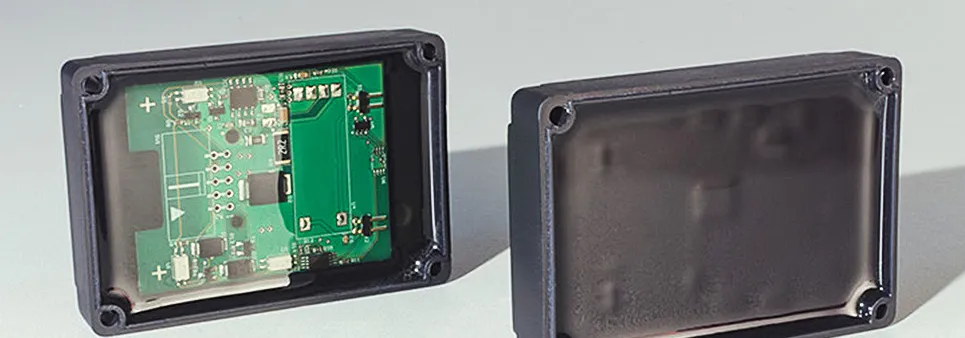
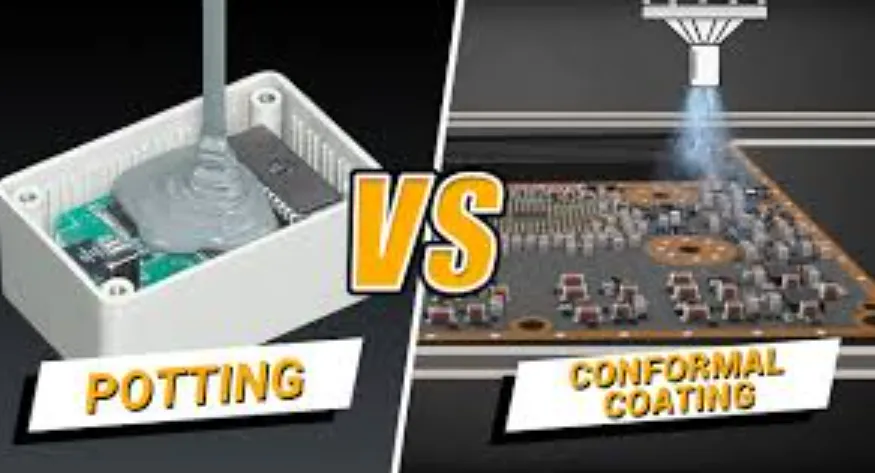
Potting is a process where an electronic assembly is placed inside a mold or container (often called the "pot") and filled with a liquid insulating compound that hardens over time. This creates a protective barrier around the circuit, shielding it from external factors like water, chemicals, and physical impact. Encapsulation, a closely related term, often refers to potting individual components rather than entire assemblies, but the terms are sometimes used interchangeably.
The importance of potting electronic circuits cannot be overstated. Without proper protection, sensitive components on a circuit board can fail due to corrosion, short-circuiting from moisture, or damage from vibrations. For example, in automotive electronics, potting can protect control units from engine vibrations and temperature fluctuations. In industrial settings, it can shield circuits from harsh chemicals or dust. By following the right encapsulation process, you can extend the lifespan of your electronics and ensure consistent performance.
Benefits of Potting Electronic Circuits
Before we get into the step-by-step resin encapsulation guide, let’s explore why potting is a go-to solution for many engineers:
- Environmental Protection: Potting compounds guard against moisture, dust, and chemicals, making them ideal for outdoor or harsh environments.
- Mechanical Stability: The hardened compound absorbs shocks and vibrations, preventing damage to delicate components.
- Electrical Insulation: Potting materials often have high dielectric strength, reducing the risk of short circuits. For instance, some epoxy compounds offer dielectric strengths of up to 500 volts per mil (0.001 inch), ensuring robust insulation.
- Thermal Management: Certain potting materials can dissipate heat, protecting components from overheating. Thermal conductivity in some compounds can reach 1.5 W/m·K, aiding in heat transfer.
- Tamper Resistance: Potting can make it difficult to reverse-engineer or tamper with the circuit, adding a layer of security.
Related Reading: The 8 Benefits of Encapsulation and Potting Electronics
Types of Potting Compounds for Circuit Board Encapsulation
Choosing the right potting compound is a critical step in the encapsulation process. Different materials offer unique properties suited for specific applications. Here are the most common types used in potting electronics:
1. Epoxy Resins
Epoxy resins are widely used due to their excellent mechanical strength and chemical resistance. They provide a hard, durable finish and are ideal for high-stress environments. However, they can be rigid and may crack under extreme thermal cycling if not formulated for flexibility. Low chloride grades are often recommended to prevent corrosion of sensitive components.
2. Silicone Compounds
Silicone potting materials are flexible and offer superior resistance to temperature extremes, ranging from -50°C to 200°C in many cases. They are perfect for applications where thermal expansion and contraction are concerns. Silicone gels are also softer, reducing stress on components during curing.
3. Polyurethane Resins
Polyurethane compounds strike a balance between flexibility and durability. They are often used in applications requiring resistance to abrasion and impact. Their curing time is typically faster than epoxy, making them suitable for high-volume production.
Related Reading: What is PCB Potting or Encapsulation?
Step-by-Step Guide to Potting Electronic Circuits
Now that you understand the basics, let’s walk through a detailed potting electronics tutorial. Follow these steps for successful circuit board encapsulation:
Step 1: Prepare Your Workspace and Materials
Start by setting up a clean, well-ventilated workspace. Gather all necessary materials, including:
- The electronic assembly to be potted
- A suitable potting compound (based on your project needs)
- A mold or enclosure to hold the compound
- Mixing tools and containers (if the compound requires mixing)
- Protective gear like gloves and safety glasses
- Release agent (if the mold needs to be removed later)
Ensure that the workspace is free from dust and debris, as contaminants can affect the curing process and the final quality of the encapsulation.
Step 2: Inspect and Prepare the Electronic Assembly
Before potting, thoroughly inspect the circuit board for any loose wires, solder defects, or damaged components. Secure any loose parts with adhesive or tape if necessary. Clean the board to remove dust, grease, or fingerprints, as these can prevent the potting compound from adhering properly. Isopropyl alcohol and a soft brush work well for cleaning.
Additionally, consider masking areas that should remain exposed, such as connectors or test points. Use heat-resistant tape or silicone plugs to cover these areas during the potting process.
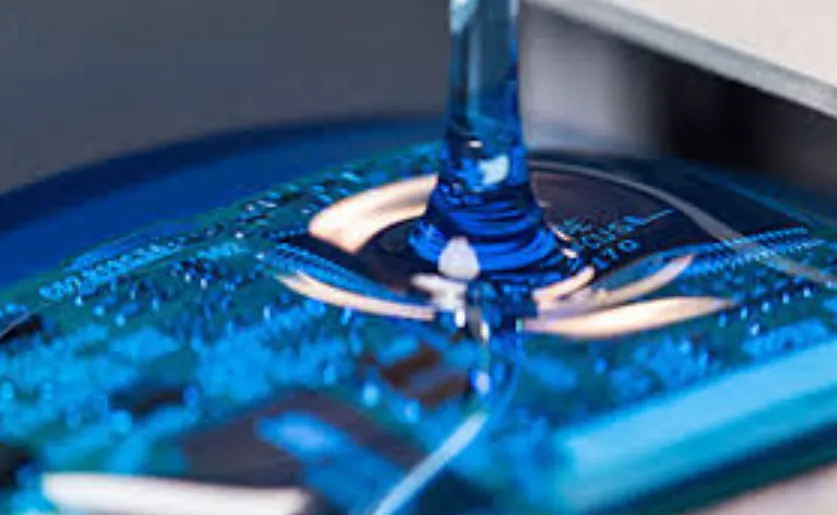
Step 3: Choose and Mix the Potting Compound
Select a potting compound based on the environmental and operational demands of your project. For instance, if your circuit will be exposed to temperatures above 150°C, a silicone-based compound might be the best choice due to its thermal stability.
If the compound comes in two parts (resin and hardener), follow the manufacturer’s instructions for mixing ratios. Typically, ratios are 1:1 or 2:1 by volume or weight. Mix slowly to avoid introducing air bubbles, which can weaken the encapsulation. Some compounds have a working time (pot life) of 20-30 minutes, so plan accordingly to complete the application within this window.
Step 4: Pour the Compound into the Mold or Enclosure
Place the electronic assembly inside the mold or enclosure. If the mold is not part of the final product, apply a release agent to make removal easier after curing. Slowly pour the mixed potting compound over the circuit board, ensuring it flows evenly around all components. Pouring slowly helps minimize air bubbles and ensures complete coverage.
For complex assemblies with tight spaces, consider using a vacuum chamber to remove trapped air before the compound cures. This step is especially important for high-reliability applications, such as aerospace or medical devices, where even small voids can lead to failure.
Step 5: Cure the Potting Compound
Allow the compound to cure as per the manufacturer’s guidelines. Curing times can vary widely—some compounds cure at room temperature in 24 hours, while others may require elevated temperatures (e.g., 60°C for 2 hours) to speed up the process. Avoid disturbing the assembly during curing to prevent defects in the encapsulation.
For best results, cure the assembly in a controlled environment with stable temperature and humidity. Fluctuations can cause uneven curing or stress cracks in the material.
Step 6: Inspect and Test the Potted Assembly
Once the compound has fully cured, remove the assembly from the mold (if applicable) and inspect it for defects like air bubbles, cracks, or incomplete coverage. Test the circuit to ensure it functions as expected. If connectors or other areas were masked, verify that they are clean and accessible.
Tips for Successful Potting Compound Application
To achieve the best results in your encapsulation process, keep these tips in mind:
- Control Temperature: Potting compounds are sensitive to temperature. Working in a space between 20°C and 25°C often yields the best results, as extreme cold or heat can affect curing times and viscosity.
- Avoid Overfilling: Leave some space at the top of the mold to account for expansion during curing. Overfilling can lead to spills or uneven surfaces.
- Test Small Batches: If you’re new to potting electronics, practice on a small, non-critical project first to get a feel for the material and process.
- Consider Thermal Expansion: Choose a compound with a coefficient of thermal expansion (CTE) close to that of your components to minimize stress during temperature changes. For example, a CTE of 20-40 ppm/°C is often compatible with common circuit board materials.
Common Challenges in Circuit Board Encapsulation and How to Overcome Them
Even with careful preparation, issues can arise during potting. Here’s how to address some common problems:
Air Bubbles in the Compound
Air bubbles can compromise the structural integrity and insulation properties of the encapsulation. To prevent this, mix and pour the compound slowly, and use a vacuum degassing chamber if possible. If bubbles form, gently tap the mold to release trapped air before curing begins.
Cracking or Delamination
Cracking often occurs due to thermal stress or improper curing. Ensure that the curing environment is stable, and select a compound with flexibility if your application involves temperature fluctuations. Delamination, where the compound separates from the board, can be avoided by cleaning the assembly thoroughly before potting.
Incomplete Coverage
If the compound doesn’t reach all areas of the circuit, components may remain exposed to environmental hazards. Use a mold with adequate depth, and pour the compound in stages for complex assemblies to ensure even distribution.
Applications of Potting in Electronics
Potting is used across various industries to enhance the durability of electronic systems. Some common applications include:
- Automotive Electronics: Protecting engine control units and sensors from heat, vibration, and oil exposure.
- Consumer Electronics: Encapsulating power supplies and chargers to prevent moisture damage.
- Industrial Equipment: Shielding control panels from dust and chemical exposure in harsh factory environments.
- Medical Devices: Ensuring the reliability of life-critical electronics by preventing contamination and mechanical failure.
Conclusion: Elevate Your Electronics with Proper Encapsulation
Mastering the art of potting electronic circuits is a valuable skill for anyone working with electronics. By following this step-by-step resin encapsulation guide, you can protect your circuit boards from environmental and mechanical threats, ensuring they perform reliably for years to come. From selecting the right potting compound to applying it with precision, each step in the encapsulation process plays a vital role in the success of your project.
Whether you’re a beginner looking for a potting electronics tutorial or an experienced engineer refining your circuit board encapsulation techniques, the key lies in preparation, attention to detail, and choosing the right materials. With the tips and methods outlined in this blog, you’re well on your way to achieving professional-grade results in potting compound application.
Take the time to experiment with different compounds and techniques to find what works best for your specific needs. The durability and performance of your electronics depend on it!


