 ALLPCB


If you're new to electronics and wondering how to use solder paste for hand soldering, especially for surface mount components (SMD), you've come to the right place. Hand soldering with solder paste is a practical skill for assembling or repairing small electronic components on a PCB. In this comprehensive guide, we'll walk you through the process of hand soldering solder paste, using a soldering iron, applying solder paste by hand, and soldering SMD with paste. Whether you're working on a hobby project or a professional prototype, this step-by-step tutorial will help you master the basics of solder paste for surface mount components.
Let’s dive into the detailed steps, tools, and tips to ensure successful soldering results with minimal frustration.
What Is Solder Paste and Why Use It for Hand Soldering?
Solder paste is a mixture of tiny solder particles suspended in a sticky flux. It’s primarily used in surface mount technology (SMT) to bond components to printed circuit boards (PCBs). Unlike traditional solder wire, which is melted with a soldering iron, solder paste is applied directly to the PCB pads before heating. The flux in the paste cleans the surfaces, while the solder particles melt to form a strong electrical and mechanical connection.
For beginners, hand soldering with solder paste is especially useful when working with tiny SMD components that have multiple pins or small footprints. Applying solder paste by hand allows for precise placement, and it’s ideal for projects where a stencil or reflow oven isn’t available. This method is perfect for prototyping, repairs, or small-scale production, making it a valuable skill for anyone in electronics.
Benefits of Using Solder Paste for Surface Mount Components
- Precision: Solder paste allows you to apply just the right amount of solder to tiny pads, reducing the risk of bridges or excess solder.
- Efficiency: It holds components in place before soldering, making it easier to work with multi-pin SMD parts.
- Clean Joints: The flux in the paste helps create clean, reliable connections by removing oxidation from metal surfaces.
Related Reading: The Ultimate Guide to Solder Paste Types for PCB Assembly
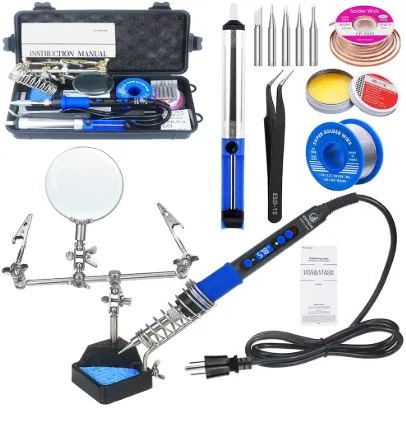
Tools and Materials Needed for Hand Soldering with Solder Paste
Before you start soldering SMD with paste, gather the following tools and materials. Having everything ready will make the process smoother and safer.
- Solder Paste: Choose a high-quality paste suitable for hand soldering. Look for a no-clean or low-residue type to minimize cleanup. Common compositions include lead-free options with a melting point around 217°C (422°F) or leaded paste at about 183°C (361°F).
- Soldering Iron: Use a fine-tip soldering iron with adjustable temperature control. A tip size of 0.5mm to 1mm works well for SMD components.
- Tweezers: Precision tweezers are essential for placing small SMD components accurately.
- Flux Pen (Optional): Extra flux can help with difficult joints or rework.
- Isopropyl Alcohol and Brush: For cleaning the PCB after soldering to remove flux residue.
- Magnifying Glass or Microscope: Helpful for inspecting tiny solder joints and ensuring accuracy.
- PCB and Components: Have your circuit board and surface mount components ready for assembly.
- Safety Gear: Use safety glasses and work in a well-ventilated area to avoid inhaling fumes.
Step-by-Step Guide to Hand Soldering with Solder Paste
Now that you have your tools and materials, let’s go through the detailed process of hand soldering solder paste. This guide focuses on using a soldering iron for applying solder paste by hand and soldering SMD components.
Step 1: Prepare Your Workspace and PCB
Start by setting up a clean, well-lit workspace. Ensure your PCB is free of dust, grease, or oxidation. If needed, clean the board with isopropyl alcohol and a brush to ensure the pads are shiny and ready for soldering. Secure the PCB on a flat surface or in a holder to prevent movement during the process.
Tip: Working on a static-free mat and wearing an anti-static wrist strap can prevent damage to sensitive components.
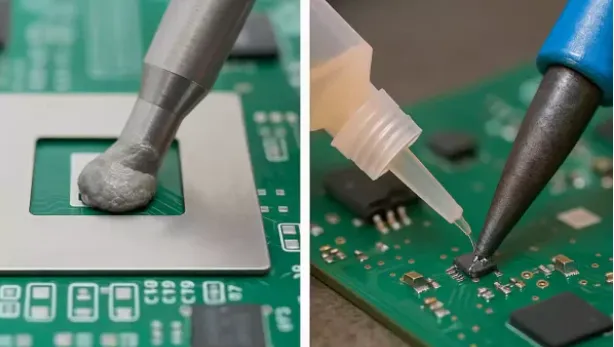
Step 2: Apply Solder Paste by Hand
Applying solder paste by hand requires a steady hand and patience, especially for small pads. Use the tip of the solder paste syringe or a small tool like a toothpick to place a tiny dot of paste on each pad where a component will be soldered. For larger components like ICs with multiple pins, apply a thin line of paste along the pads.
Key Point: Avoid applying too much paste, as it can cause solder bridges (short circuits) between pins. A small dot, about 1-2mm in diameter for typical SMD pads, is usually enough.
Step 3: Place the SMD Components
Using precision tweezers, carefully place the surface mount components onto the pads with solder paste. The sticky nature of the paste will hold the components in place. Make sure the component pins or leads align perfectly with the pads. Double-check the orientation of polarized components like diodes or ICs to avoid mistakes.
Tip: Use a magnifying glass to confirm alignment, especially for components with fine pitch (spacing between pins as small as 0.5mm).
Step 4: Heat the Solder Paste with a Soldering Iron
Set your soldering iron to the appropriate temperature based on the solder paste type. For lead-free solder paste, a temperature of 250-300°C (482-572°F) is typical, while leaded paste may require 220-250°C (428-482°F). Always check the manufacturer’s recommendations for the paste you’re using.
Touch the tip of the soldering iron to each pad with solder paste. Hold it there for 2-3 seconds until the paste melts and forms a shiny joint. Avoid overheating, as it can damage components or lift pads from the PCB. Move systematically from one pin to the next, ensuring all connections are soldered.
For multi-pin components, start with one corner pin to anchor the component, then solder the opposite corner before completing the remaining pins. This prevents misalignment during soldering.
Step 5: Inspect the Solder Joints
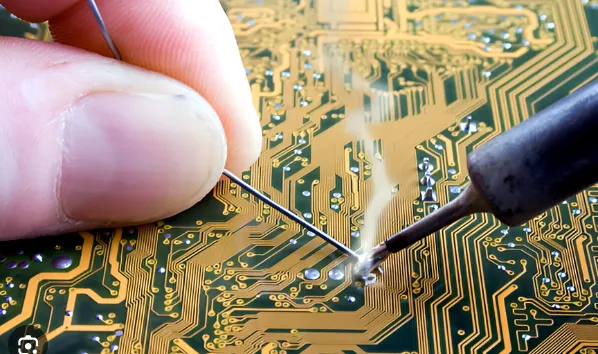
After soldering, inspect each joint under a magnifying glass or microscope. Look for shiny, smooth joints that fully wet the pad and component lead. If a joint looks dull or incomplete, it may be a “cold joint” that requires reheating. Also, check for solder bridges between pins and remove excess solder with a desoldering braid if needed.
Step 6: Clean the PCB
Once you’ve confirmed the joints are good, clean the PCB to remove flux residue. Use isopropyl alcohol and a small brush to scrub the soldered areas gently. This step is especially important if you’re using a paste that isn’t no-clean, as leftover flux can cause corrosion over time.
Tips for Successful Soldering SMD with Paste
Hand soldering with solder paste can be tricky at first, but these tips will help you achieve better results and avoid common mistakes.
- Use the Right Amount of Paste: Too much paste leads to bridges, while too little may result in weak joints. Practice on a scrap PCB to get a feel for the correct amount.
- Control Your Iron Temperature: Overheating can damage components or burn the PCB. If you’re unsure, start with a lower temperature and increase it gradually.
- Work Quickly but Carefully: Solder paste can dry out if left exposed for too long before heating. Place components and solder soon after applying the paste.
- Practice on Larger Components First: Start with larger SMD parts like 1206 resistors or capacitors before moving to fine-pitch ICs with pin spacing below 0.8mm.
- Store Solder Paste Properly: Keep solder paste in a refrigerator (around 5-10°C or 41-50°F) to extend its shelf life, and let it reach room temperature before use to avoid condensation.
Common Mistakes to Avoid When Using Solder Paste with Soldering Iron
Beginners often face challenges when soldering SMD with paste. Here are some common pitfalls and how to avoid them.
- Applying Too Much Paste: This causes solder bridges between closely spaced pins. Use a syringe with a fine tip for better control.
- Misaligning Components: Always double-check component placement before soldering, as repositioning after heating can be difficult.
- Overheating Joints: Holding the iron on a pad for more than 3-5 seconds can damage components or lift PCB traces. Work quickly and use the correct temperature.
- Skipping Cleaning: Flux residue can attract dust or cause corrosion. Always clean the board after soldering unless using a no-clean paste.
Related Reading: Creating Custom Solder Tips: Adapting Your Iron for Unique Hand Soldering Challenges
When to Use Solder Paste vs. Solder Wire for Hand Soldering
While solder paste is ideal for surface mount components, it’s not always the best choice. Here’s a quick comparison to help you decide when to use solder paste with a soldering iron versus traditional solder wire.
- Solder Paste: Best for SMD components with multiple pins, fine-pitch ICs, or when precision is critical. It’s also useful for temporarily holding parts in place before soldering.
- Solder Wire: Better for through-hole components, larger joints, or quick repairs where applying paste by hand isn’t practical. It’s also easier to control for beginners in some cases.
For most SMD work, solder paste offers better control and cleaner results, especially when combined with a fine-tip soldering iron.
Conclusion: Mastering Hand Soldering with Solder Paste
Hand soldering with solder paste is a valuable skill for anyone working with surface mount components. By following this step-by-step guide, you can confidently tackle applying solder paste by hand, soldering SMD with paste, and using solder paste with a soldering iron. From preparing your workspace to inspecting and cleaning your PCB, each step ensures strong, reliable connections for your electronics projects.
Start small, practice often, and soon you’ll be soldering tiny components with ease. Whether you’re building a prototype or repairing a device, mastering hand soldering solder paste opens up a world of possibilities in electronics assembly. With the right tools, techniques, and patience, you’ll achieve professional-quality results every time.


