ALLPCB


Overview
Zynq devices combine ARM and FPGA, leveraging the strengths of both: the ARM core provides flexible control, while the FPGA logic can accelerate algorithms. This expands Zynq applications such as deep learning acceleration and image processing. The FPGA logic side is referred to as PL, and the ARM side including some AXI interface control is referred to as PS. PS and PL interconnect and communicate through AXI. PS can configure and control PL logic via AXI, and PL exchanges data with PS over AXI.
This article describes building a Linux system on a Zynq-7020 device, covering PL-side configuration and the configuration and building of FSBL, U-Boot, the kernel, and the root filesystem.
1. Vivado Project and Hardware Design
This guide uses a Zynq-7020 development board. To create a minimal Linux system, the following hardware settings are required.
1) Add and configure the ARM processing system
Open Vivado, create a new project, then create a block design and add the Zynq processing system. The IIC shown in the diagram was later added when developing an I2C driver; a minimal Linux system does not require I2C.
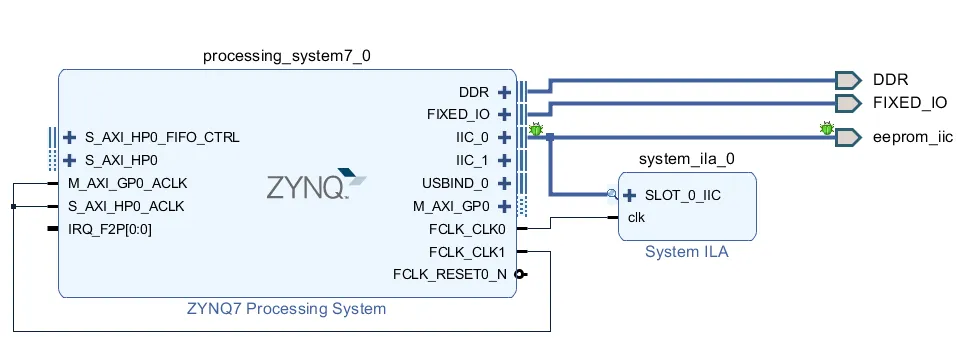
Figure 1.1 Add the Zynq processing system
2) Bank IO voltage settings
Set bank IO voltages according to the schematic. Also configure the SD card pins according to the schematic. The Linux system will boot from the SD card, so select the SD pins used on your board.
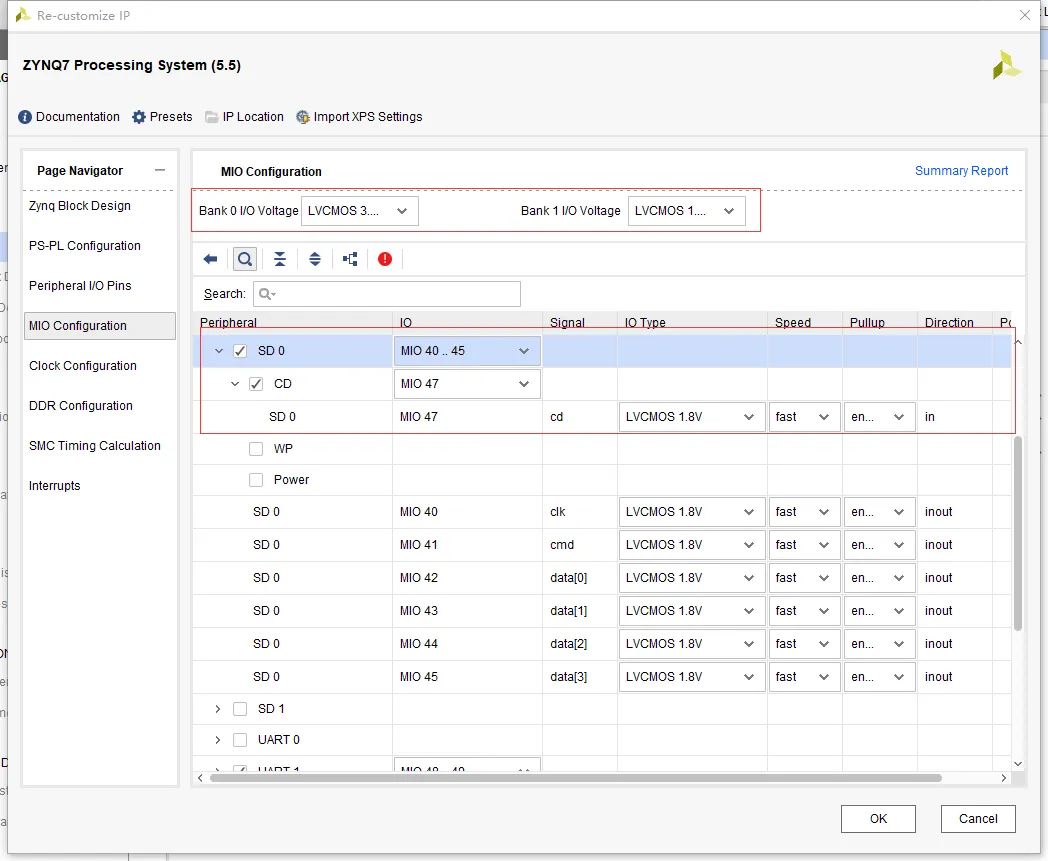
Figure 1.2 IO voltage and SD card pin configuration
3) UART pin configuration
A serial port is required for debugging, so configure the UART MIO pins.

Figure 1.3 UART pin configuration
4) DDR configuration
Memory is required. Select the DDR part matching your board; for example, choose MT41J256M16RE-125 if that matches your hardware.
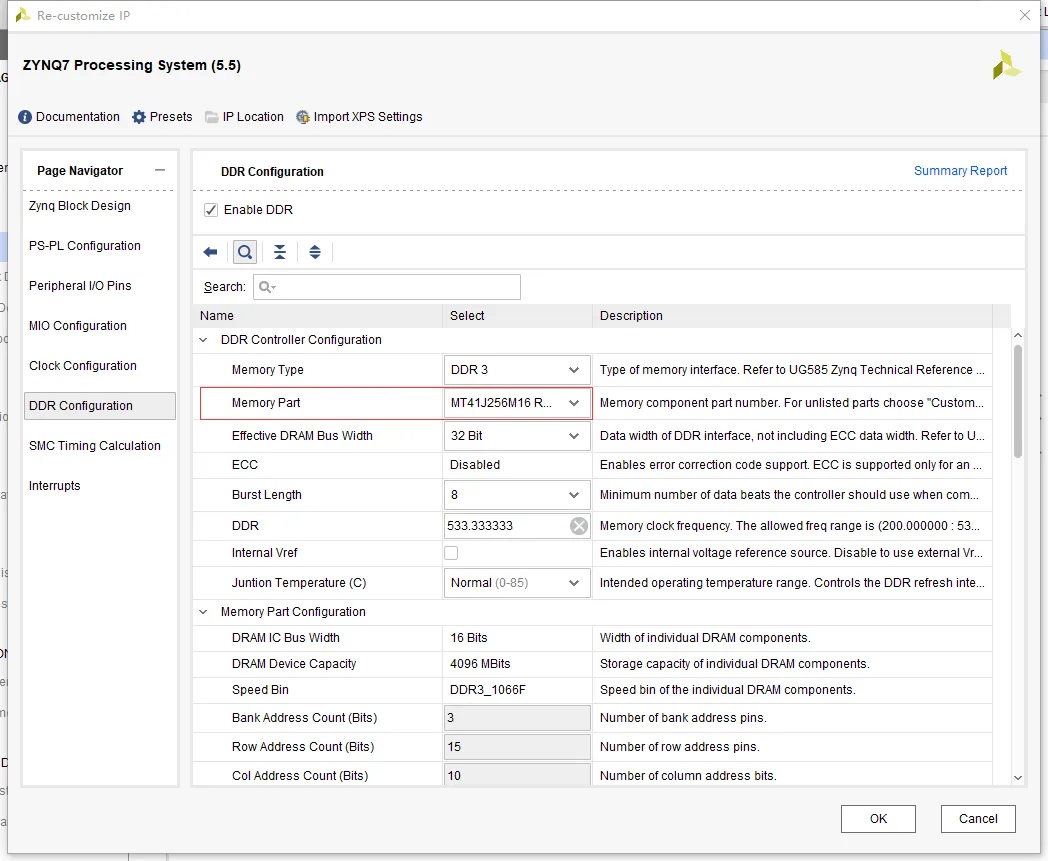
Figure 1.4 DDR configuration
With these settings completed, run synthesis and implementation, generate the bitstream, then use File -> Export -> Export Hardware and include the bitstream to generate the hardware platform required by Linux.
Generate FSBL and device tree
Linux boot requires an FSBL. The typical boot flow is: FSBL (performs basic hardware initialization for IO voltage, SD card, UART, then launches U-Boot) then U-Boot (performs further hardware checks and launches the kernel) then kernel (Linux and drivers) then root filesystem.
Launch the Xilinx SDK to build FSBL and the device tree. Create a new application project: Zynq FSBL, then build to produce fsbl.elf. If U-Boot has also been built, SDK can create boot.bin by selecting the FSBL project, right-click Create Boot Image, choose the U-Boot binary path, set the partition type appropriately, and create the image. The resulting boot.bin will appear in the bootimage folder under the FSBL project.
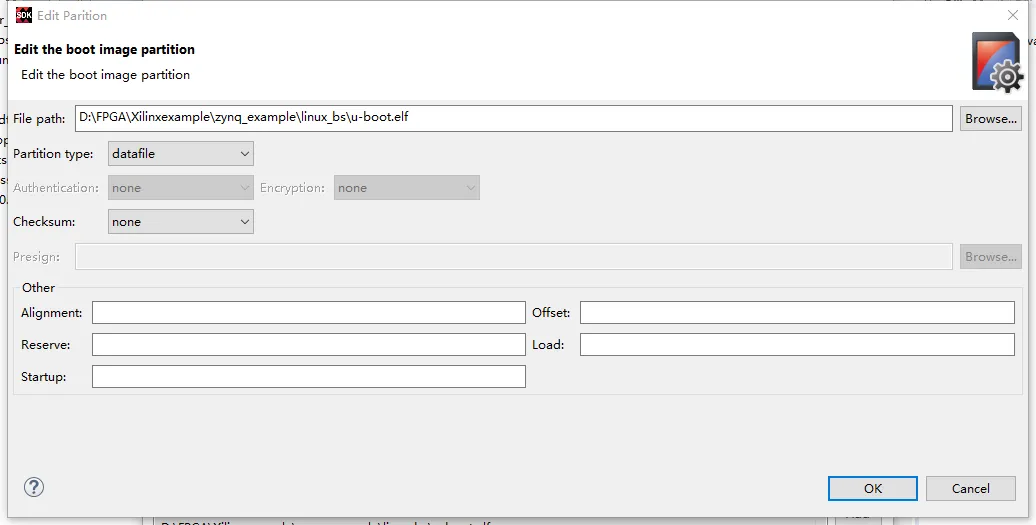
Figure 1.5 Selecting the U-Boot path when creating boot.bin
To generate a device tree, use the upstream Xilinx device-tree repository and add the device tree source files to the SDK repositories. Then create a new Board Support Package project of type Device Tree to generate device tree source files. Typical source files include:
- Zynq-7000.dtsi: default Zynq-7000 hardware configuration, usually unchanged.
- pcw.dtsi: platform-specific configuration. For example, enable SDHCI here and set its status to "okay" if the default device tree has it disabled.
- system-top.dtsi: aliases and chosen nodes, for example setting stdout-path to the chosen boot output (typically the serial console).
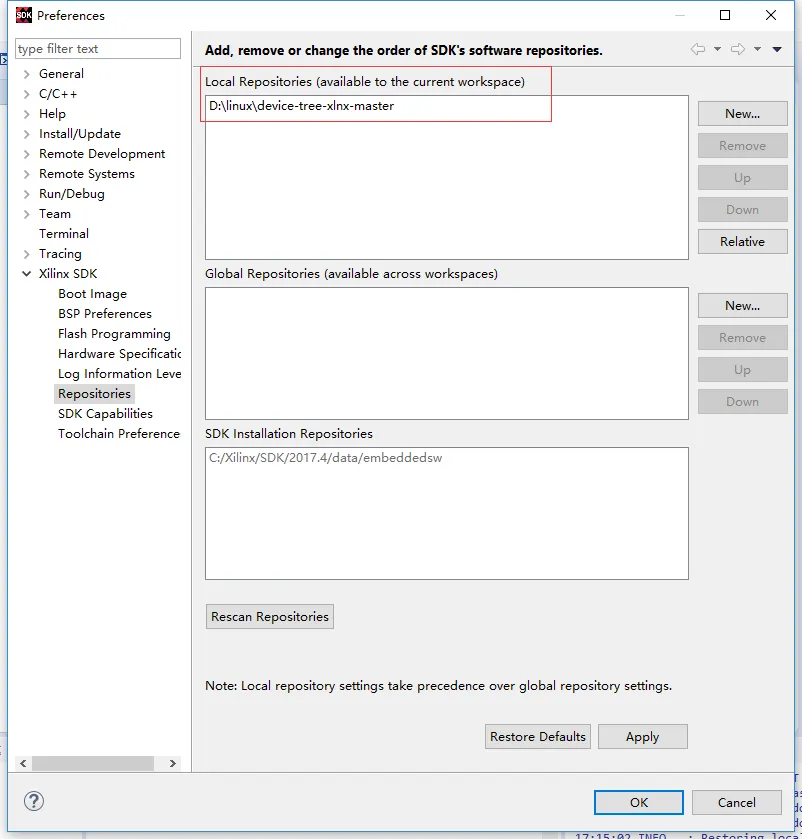
Figure 1.6 Adding device tree files to SDK repositories
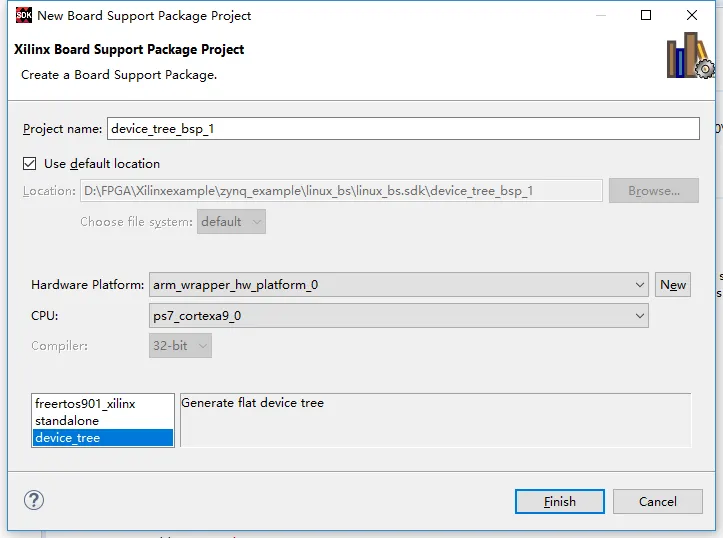
Figure 1.7 Generated device tree source files
At this point the hardware platform, device tree, and FSBL have been generated.
2. U-Boot Build
Download the U-Boot source (Xilinx u-boot-xlnx repository) and configure the board by editing the ./configs/*_defconfig file for your hardware. For a ZC702-based board, zynq_zc702_defconfig may be used as a starting point. You can rename the defconfig to board_name_defconfig and add a corresponding ./include/configs/board_name.h describing board-specific settings.
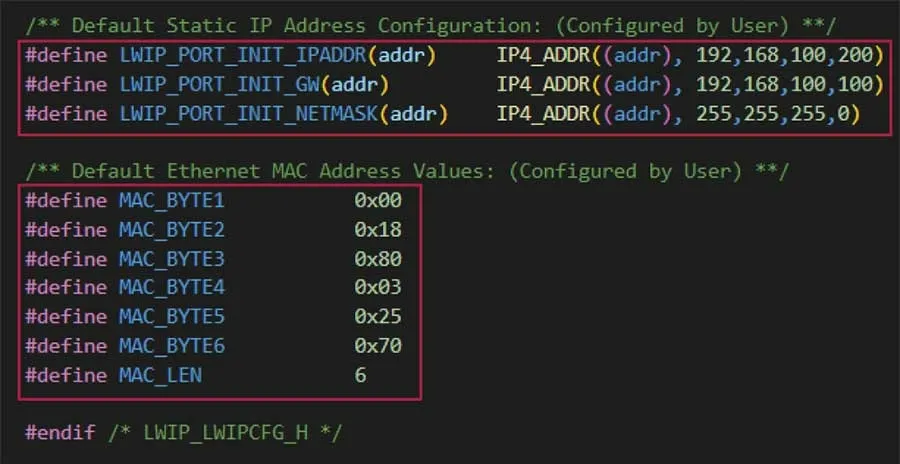
Copy and adapt the appropriate header in ./include/configs. Modify zynq_common.h if necessary. If the root filesystem will be on the SD card second partition, update CONFIG_EXTRA_ENV_SETTINGS to disable ramdisk boot and set up environment variables accordingly.
Create uEnv.txt to set U-Boot environment variables, specifying the root filesystem location (for example, SD partition 2) and filesystem type (for example, ext3).
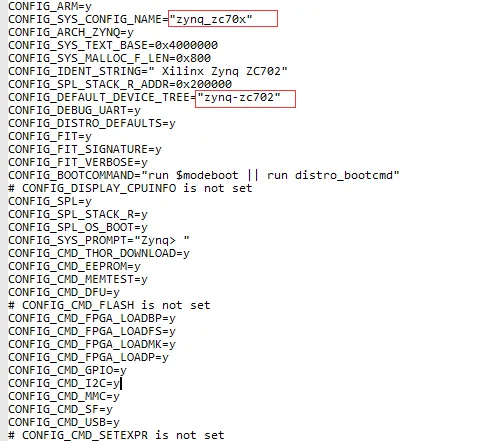
Figure 2.1 defconfig file; the highlighted fields can be changed to your board name and device tree name


Figure 2.2 sdboot variable before and after modification

Figure 2.3 uEnv.txt settings
To compile U-Boot, use a suitable ARM cross toolchain such as arm-xilinx-linux-gnueabi. If not provided by Vivado, obtain the toolchain separately and add it to PATH, for example:
export PATH=$PATH:dir/bin
You can also set the default compiler in the Makefile. Then run:
make board_name_defconfig
make
The build produces u-boot.elf in the top-level directory, which is used to create boot.bin as described earlier.
3. Kernel Build
Download the kernel source from the appropriate repository. The kernel contains all drivers; if you modify drivers, configure and build them here. For new drivers, you can normally compile them separately and load them dynamically at runtime, so rebuilding the entire kernel is not always necessary.
Set the cross-compiler in the kernel Makefile as with U-Boot. To build a U-Boot-compatible kernel image, run:
make uImage LOADADDR=0x00008000
The resulting uImage will be generated in arch/arm/boot.
Compile the device tree source into a binary device tree blob using the device tree compiler (dtc). Ensure the dtb filename matches the device tree name expected by U-Boot (commonly devicetree.dtb). Example:
dtc -I dts -O dtb -o devicetree.dtb your.dts
For the root filesystem, use a Linaro Ubuntu filesystem or another suitable distribution. Partition the SD card with a small FAT partition (about 200 MB) for boot files and a second ext3 partition for the root filesystem. The FAT partition stores boot.bin, uImage, devicetree.dtb, and uEnv.txt. The ext3 partition contains the root filesystem.
4. Linux Boot Sequence
The typical boot sequence and key steps are:
- FSBL initializes hardware and hands control to U-Boot.
- U-Boot loads environment, kernel image, and device tree.
- U-Boot starts the kernel.
- The kernel mounts the root filesystem and completes system startup.
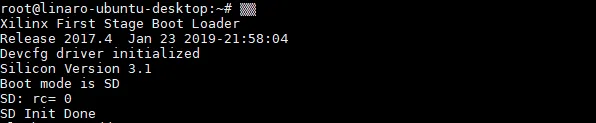
Figure 4.1 FSBL startup
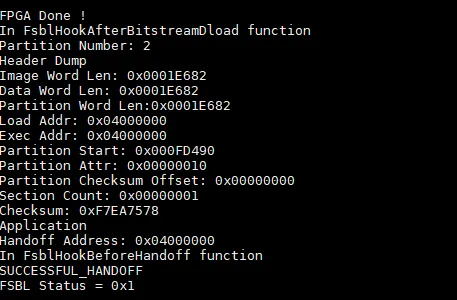
Figure 4.2 FSBL complete
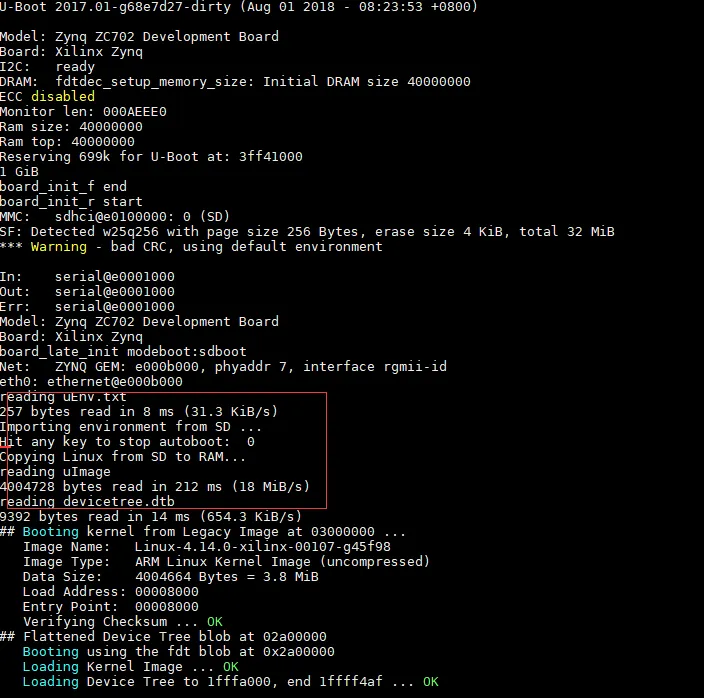
Figure 4.3 U-Boot: load environment, kernel image, and device tree
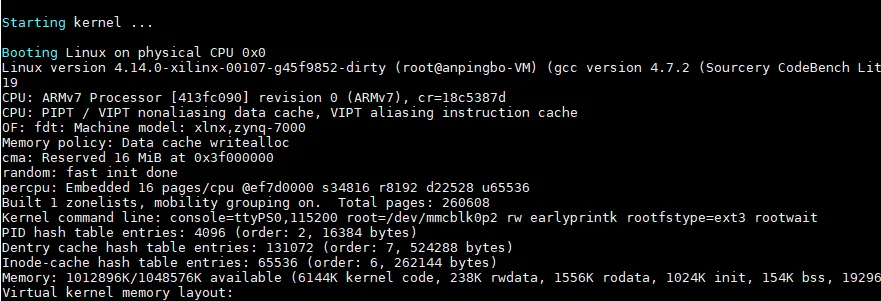
Figure 4.4 Kernel startup
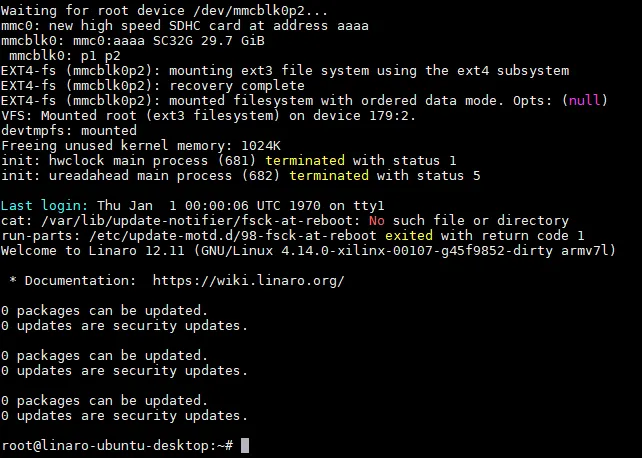
Figure 4.5 Root filesystem startup
Summary
This article outlines how to build a minimal Linux system on a Zynq-7000 platform. The process includes Vivado project creation, generation of FSBL and device tree, U-Boot configuration and build, kernel compilation, and root filesystem preparation.