ALLPCB


Overview
When a loved one is ill, missing doses or forgetting to take medication on time is a common concern. In hospitals with many patients it can be difficult to remind each patient to take medication on schedule. Rather than relying solely on manual reminders, an automated system can provide consistent alerts. A medicine reminder can be used for patients at home, in clinical settings, or integrated with patient monitoring systems.
Common reminder methods include:
- Display messages on a screen
- Notifications via email or phone
- Mobile apps
- Buzzer alarms
- Bluetooth or Wi-Fi
- Phone calls
- Displaying the next dose time along with the current time
This project demonstrates a simple Arduino-based medicine reminder that supports once-, twice-, or three-times-per-day schedules. Time slots are selectable with buttons and the system displays the current date and time. The design can be extended to send email or SMS notifications or to integrate with remote monitoring systems.
Required Components
- Arduino Uno (other Arduino boards such as Pro Mini or Nano can also be used)
- RTC DS3231 module
- 16x2 LCD display
- Buzzer
- LED (any color)
- Breadboard
- Push buttons
- 10K potentiometer
- 10K and 1K resistors
- Jumper wires
Circuit Diagram
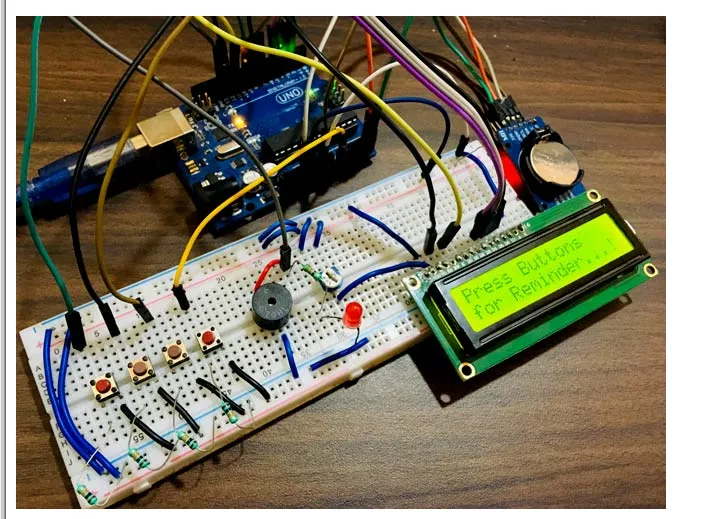
The complete circuit for the Arduino medicine reminder is shown below.
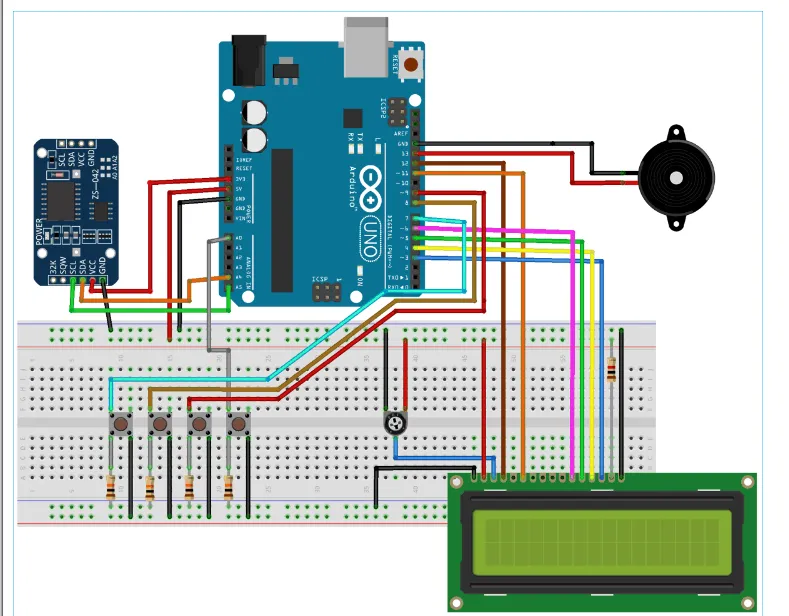
The following images show pin connections between the Arduino and peripherals.
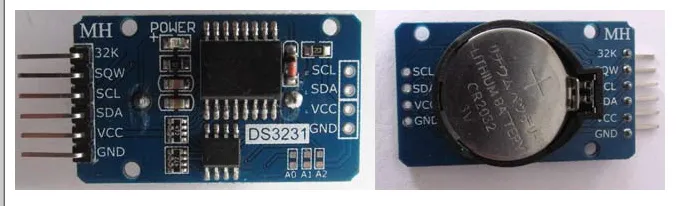
In this project the RTC DS3231 connects to the Arduino Uno via I2C. An RTC IC such as the DS1307 could also be used. The DS3231 includes an onboard 32k memory for storing additional data. The RTC module is powered from the Arduino Uno 3.3V pin. A 16x2 LCD is used for display. The buzzer provides audible alerts. Four buttons provide different selection functions: one button selects once-per-day reminders, the second selects twice-per-day, the third selects three-times-per-day, and the fourth stops the buzzer when an alert sounds.
How the Automatic Reminder Works
The system is powered by a 5V supply. On startup it displays a welcome message. The LCD cycles through three screens: a short greeting, a help screen that instructs the user to press a selection button for one/two/three times-per-day reminders, and a screen showing the current date and time. Time slots are configurable in software; in this example they are set to 08:00, 14:00, and 20:00.
There are three modes: mode 1 triggers once per day at 08:00; mode 2 triggers twice per day at 08:00 and 20:00; mode 3 triggers three times per day at 08:00, 14:00, and 20:00.
An optional snooze function (pause buzzer for 10 minutes) can be added. When the user selects a mode by pressing a button, the choice is recorded and the current time is read from the RTC. When the RTC time matches a selected slot the buzzer starts. The user can stop the buzzer by pressing the STOP button. The next scheduled slot follows the same process. The full process is shown in the video at the end of the article.
Programming the Arduino Uno
With the design decided, writing the code is straightforward. The program displays reminders on the LCD, sounds the buzzer, and indicates with an LED. It also allows selecting one/two/three time slots. The basic workflow is:
- Display help instructions on the screen
- User selects a time slot option (once/day, twice/day, three times/day)
- Print confirmation message on the display
- Start timing
- When time matches the user selection, start buzzer and LED
- User presses the STOP button to stop alerts
- End
The program is modularized into small functions for clarity. Libraries are required for the LCD and RTC. Example required libraries include:
(https://github.com/adafruit/RTClib)
The EEPROM library is used to track and restore the user's previous selection when the Arduino is powered on. Wire.h is required for I2C communication with the RTC DS3231.
Verify the RTC wiring and module operation, as the RTC plays a central role in timing reminders.
RTC Initialization
if (!rtc.begin()) { // Check if rtc is connected
    Serial.println("Couldn't find RTC");
    while (1);
  }
if (rtc.lostPower()) {
    Serial.println("RTC Power off. Let's set the time!");
  }
Setting RTC Time
Time can be set automatically using the system compile time or manually specified. Once the time is set, comment out the adjust line to avoid resetting the RTC on subsequent uploads.
rtc.adjust(DateTime(F(__DATE__), F(__TIME__))); // Uncomment to set current time, then comment on next upload after you set the time
//rtc.adjust(DateTime(2019, 1, 10, 7, 59, 52));
Restoring Saved Mode
val2 = EEPROM.read(addr); // Read previously saved button value to resume from previous position
  switch (val2) {
    case 1:
      Serial.println("Set for 1/day");
      push1state = 1;
      push2state = 0;
      push3state = 0;
      pushVal = 01;
      break;
    case 2:
      Serial.println("Set it to 2/day");
      push1state = 0;
      push2state = 1;
      push3state = 0;
      pushVal = 10;
      break;
    case 3:
      Serial.println("Set it to 3/day");
      push1state = 0;
      push2state = 0;
      push3state = 1;
      pushVal = 11;
      break;
  }
LCD Screen Timing
currentMillisLCD = millis(); // Start LCD screen switching timer in milliseconds at defined interval
Read Button Inputs
push1state = digitalRead(push1pin);
push2state = digitalRead(push2pin);
push3state = digitalRead(push3pin);
stopinState = digitalRead(stopPin);
Button Handling and EEPROM
The following function reads a button press, writes the selection to EEPROM, and prints a confirmation on the LCD. Similar functions are used for the other selection buttons.
void push1() { // Function to set reminder for once per day
  if (push1state == 1) {
    push1state = 0;
    push2state = 0;
    push3state = 0;
// pushPressed = true;
    EEPROM.write(addr, 1);
    Serial.print("Push1 写入:"); Serial.println(EEPROM.read(addr)); // For debugging
    pushVal = 1; //Save the status of push button-1 lcd.clear();
    lcd.setCursor(0, 0);
    lcd.print("Setting");
    lcd.setCursor(0, 1);
    lcd.print("once a day");
    delay(1200);
    lcd.clear();
  }
}
Stopping Alerts
This function stops the buzzer and LED when the STOP button is pressed and displays a brief suggestion message on the LCD.
void stopPins() { // Function to stop buzzing when user presses the stop button
  if (stopinState == 1) {
// stopinState = 0;
// pushPressed = true;
    push = 1;
    lcd.clear();
    lcd.setCursor(0, 0);
    lcd.print("take medicine");
    lcd.setCursor(0, 1);
    lcd.print("use warm water");
    delay(1200);
    lcd.clear();
  }
}
Screen Cycling
This function cycles through three informational screens to assist the user.
void changeScreen() { // Screen cycling function
  // Start switching screens every defined intervalLCD
  if (currentMillisLCD - previousMillisLCD > intervalLCD) // Save time of last display change
  {
    previousMillisLCD = currentMillisLCD;
    screen++;
    if (screen > maxScreen) {
      screen = 0; // All screens finished -> start from the first
    }
    isScreenChanged = true;
  }
  // Begin displaying current screen
  if (isScreenChanged) // Only update the screen when it has changed
  {
    isScreenChanged = false; // Reset for the next iteration
    switch (screens)
    {
      case getWellsoon:
        gwsMessege(); // Get well soon message
        break;
      case HELP_SCREEN:
        helpScreen(); // Instruction screen
        break;
      case TIME_SCREEN:
        timeScreen(); // Print date and time
        break;
      default:
        // Not set.
        break;
    }
  }
}
Starting the Buzzer and LED
This function toggles the LED and controls the buzzer timing when an alert is active.
void startBuzz() { // Function to start buzzing when the defined time interval is reached
// if (pushPressed == false) {
if (pushpressed == 0) {
    Serial.println("pushpressed is false in blink");
    unsigned long currentMillis = millis();
    if (currentMillis - previousMillis >= interval) {
      previousMillis = currentMillis; // Save time of last LED toggle
      Serial.println("Start Buzzing");
      if (ledState == LOW) { // If the LED is off, turn it on, and vice versa:
        ledState = HIGH;
      } else {
        ledState = LOW;
      }
      digitalWrite(ledPin, ledState);
    }
  }
else if (pushpressed == 1) {
    Serial.println("pushpressed is true");
    ledState = LOW;
    digitalWrite(ledPin, ledState);
  }
}
Time Slot Check Example
The following function checks if the current time has reached the 08:00 slot and starts the alert routine.
void at8am() { // Function to start buzzing at 8 AM
  DateTime now = rtc.now();
  if (int(now.hour()) >= buzz8amHH) {
    if (int(now.minute()) >= buzz8amMM) {
      if (int(now.second()) > buzz8amSS) {
        ////// ///////////////////////////////////////
        startBuzz();
        ///////////////////////////////////////// ///
      }
    }
  }
}
Conclusion
This project shows how to build a simple Arduino-based automatic medicine reminder that supports multiple daily schedules, displays time and messages, and uses a buzzer and LED for alerts. The design can be extended with additional features such as a snooze timer, remote notifications, or integration with monitoring systems.