 ALLPCB


If you're wondering how to salvage components from old ECU (Engine Control Unit) PCBs, you're in the right place. Salvaging PCB components is a fantastic way to recycle electronics, save money, and learn more about electronic components. In this beginner's guide, we'll walk you through the process of extracting components from PCBs, focusing on desoldering components safely and effectively. Whether you're a hobbyist or just starting out, this detailed guide will help you master the art of recycling electronics from old automotive control units.
Let’s dive into the step-by-step process of salvaging components, from gathering tools to identifying valuable parts on an ECU PCB. By the end, you'll have the skills to start extracting components from PCBs and reusing them in your projects.
Why Salvage Components from ECU PCBs?
ECU PCBs, found in vehicles to control engine functions, are packed with useful electronic components like resistors, capacitors, transistors, and even microcontrollers. Salvaging these parts offers several benefits. First, it’s a cost-effective way to build a collection of components for DIY projects. Second, recycling electronics reduces e-waste and promotes sustainability. Finally, working with ECU PCBs provides a hands-on way to understand automotive electronics, which often operate under high-stress conditions with specific impedance values (e.g., resistors in the range of 1kΩ to 10kΩ for signal conditioning).
Old ECUs can often be sourced from scrap yards, online marketplaces, or even personal vehicles that are no longer in use. These boards are treasure troves for anyone interested in electronics, as they contain parts that can withstand harsh environments, making them ideal for rugged projects.
Tools and Safety Precautions for Salvaging PCB Components
Before you start extracting components from a PCB, you need the right tools and safety measures in place. Working with electronics involves heat and potentially hazardous materials, so preparation is key.
Essential Tools for Desoldering Components
- Soldering Iron (25-40W): A medium-powered iron with a fine tip works best for desoldering small components on ECU PCBs.
- Desoldering Pump or Solder Wick: These tools remove molten solder from joints. A desoldering pump sucks up solder, while solder wick absorbs it.
- Tweezers: Precision tweezers help lift components off the board without damaging them.
- Multimeter: Useful for testing salvaged components to ensure they still function.
- Wire Cutters: For trimming leads after desoldering.
- Safety Gear: Wear safety goggles and work in a well-ventilated area to avoid inhaling solder fumes.
Safety Tips
Always unplug any device before working on it, even if it’s an old ECU. Handle soldering tools with care to avoid burns, and use a heat-resistant mat to protect your workspace. Additionally, be aware that some older ECUs might contain hazardous materials like lead-based solder, so wash your hands after handling and dispose of waste responsibly.

Step-by-Step Guide to Extracting Components from ECU PCBs
Now that you’re equipped with the right tools and safety knowledge, let’s go through the process of salvaging PCB components from an ECU board. Follow these steps to ensure a smooth and successful extraction.
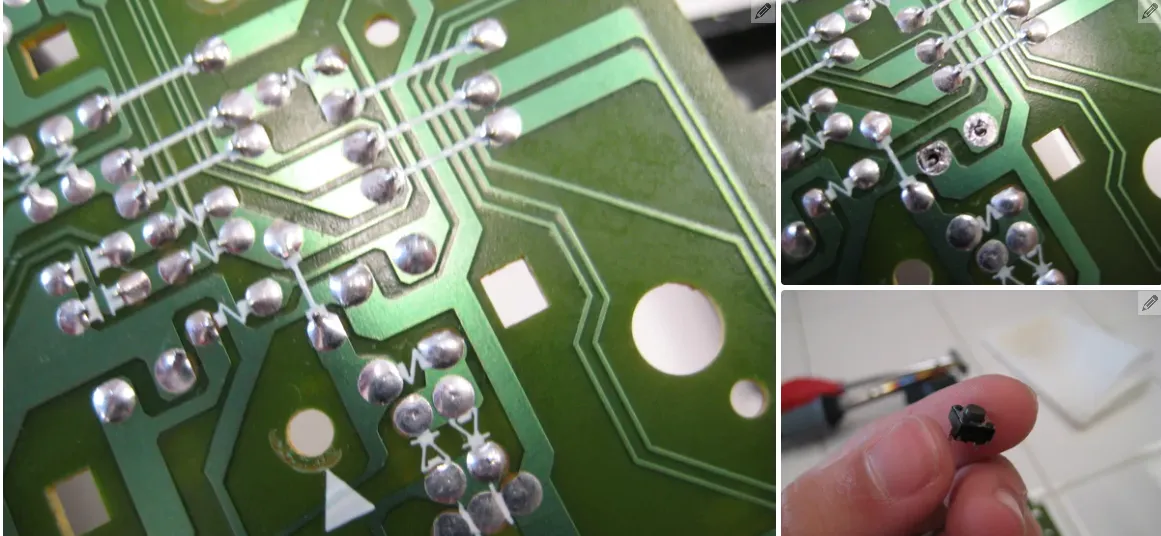
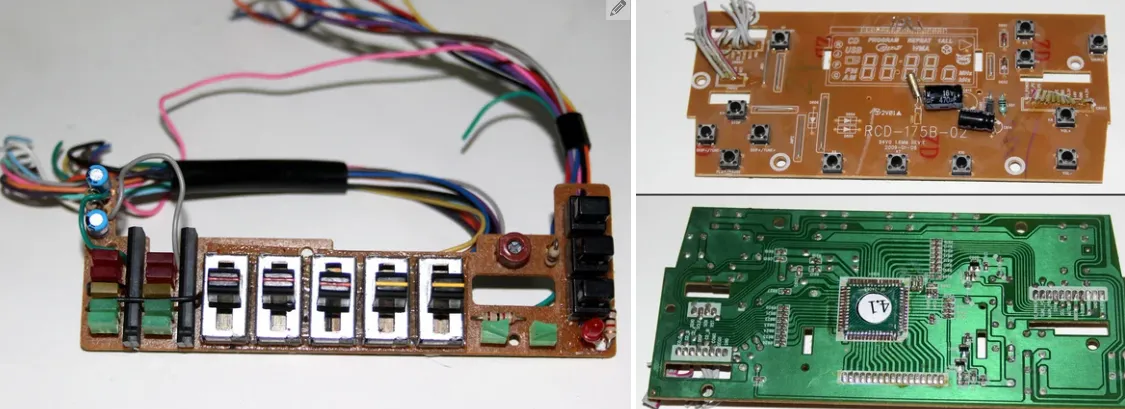
Step 1: Inspect the ECU PCB
Start by examining the board. ECU PCBs are often compact, with components packed tightly together. Identify the parts you want to salvage, such as capacitors (often rated at 16V to 50V for automotive use), resistors, diodes, or IC chips. Look for markings or color codes to help identify values. For example, a resistor with bands of brown, black, red, and gold indicates a 1kΩ resistor with a 5% tolerance.
Make a note of larger components like relays or power transistors, as these are often reusable in automotive projects. Avoid components that appear damaged or burned, as they’re unlikely to function properly.
Step 2: Prepare Your Workspace
Set up your tools on a clean, heat-resistant surface. Ensure good lighting so you can see small solder joints clearly. If possible, use a magnifying glass or a microscope for precision work on tiny components. Keep a small container nearby to store salvaged parts and prevent them from getting lost.
Step 3: Desoldering Components
Desoldering is the core skill for salvaging PCB components. Here’s how to do it:
- Heat the Solder Joint: Place the tip of your soldering iron on the solder joint of the component you want to remove. Wait 2-3 seconds for the solder to melt. Avoid applying too much heat, as it can damage the component or the board (keep exposure under 5 seconds per joint).
- Remove the Solder: Use a desoldering pump or solder wick to remove the molten solder. With a pump, position it over the joint and press the button to suck up the solder. With wick, place it on the joint and heat it to absorb the solder.
- Lift the Component: Once the solder is removed, gently lift the component off the board using tweezers. If it doesn’t come off easily, reheat the joints to ensure all solder is gone.
For multi-pin components like IC chips, work on one pin at a time or use a hot air rework station if available. Hot air tools can heat multiple pins simultaneously, making removal faster and safer for delicate parts.
Step 4: Clean and Test the Components
After removing components, clean off any excess solder or flux residue using isopropyl alcohol and a small brush. Then, test the components with a multimeter to check if they’re still functional. For example, set your multimeter to capacitance mode to test capacitors (common ECU values range from 1μF to 100μF) or to resistance mode for resistors. Discard any parts that don’t pass the test.
Step 5: Store Salvaged Parts
Organize your salvaged electronic components in labeled containers or a parts organizer. Group them by type (e.g., resistors, capacitors) and value for easy access in future projects. Proper storage prevents damage and saves time when you’re ready to reuse them.
Common Components to Salvage from ECU PCBs
ECU PCBs contain a variety of electronic components worth salvaging. Here are some of the most common and useful ones for beginners:
- Resistors: Used for limiting current or dividing voltage. Values on ECU boards often range from 100Ω to 10kΩ.
- Capacitors: Store and release energy, often rated for 16V to 50V to handle automotive voltage spikes.
- Diodes: Protect circuits from reverse voltage. Look for signal diodes or power diodes used in power regulation.
- Transistors: Act as switches or amplifiers. Power transistors on ECUs often handle currents up to 1A or more.
- Microcontrollers and ICs: These are the brains of the ECU. Salvaging them can be tricky due to multiple pins, but they’re valuable for learning or specific repairs.
- Relays: Found in some ECUs for controlling high-current devices like fuel pumps. These are often reusable if undamaged.
Tips for Successful Recycling of Electronics
Salvaging components from ECU PCBs is rewarding, but it comes with challenges. Here are some tips to make the process smoother:
- Start Small: If you’re new to desoldering components, practice on less valuable boards before tackling a complex ECU PCB.
- Avoid Overheating: Excessive heat can damage components or lift PCB traces. Limit soldering iron contact to a few seconds per joint.
- Use Flux: Applying flux before desoldering helps the solder flow better, making removal easier and cleaner.
- Document Your Work: Take photos or notes of the board before removing parts. This helps if you need to reference the layout later.
- Dispose of Waste Properly: Solder and damaged components should be recycled at e-waste facilities to prevent environmental harm.
Challenges and How to Overcome Them
Extracting components from a PCB isn’t always straightforward, especially with ECU boards that may have conformal coatings or tightly packed layouts. Here are common issues and solutions:
- Conformal Coating: Many ECU PCBs have a protective coating to resist moisture and vibration. Use a solvent like acetone (with caution and ventilation) to remove it before desoldering.
- Small Components: Surface-mount devices (SMDs) are tiny and hard to remove. Use a hot air rework station or fine-tip tweezers for precision.
- Damaged Pads: If a PCB pad or trace lifts during desoldering, the board may become unusable for future projects. Work carefully and avoid excessive force.
Creative Uses for Salvaged Electronic Components
Once you’ve mastered salvaging PCB components, the possibilities for reusing them are endless. Here are a few ideas to inspire your next project:
- Build Simple Circuits: Use resistors and capacitors to create basic timers or filters for hobby projects.
- Repair Electronics: Replace faulty components in other devices using your salvaged parts.
- Automotive Projects: Reuse relays or power transistors for custom car mods, like LED lighting or motor control.
- Educational Models: Use salvaged ICs and microcontrollers to learn about programming or circuit design.
Conclusion: Start Salvaging Today
Salvaging components from old ECU PCBs is a practical and eco-friendly way to dive into the world of electronics. By desoldering components and recycling electronics, you not only save money but also gain valuable skills in handling electronic components. With the right tools, a bit of patience, and the steps outlined in this guide, extracting components from PCBs becomes an achievable task for any beginner.
Grab an old ECU board, set up your workspace, and start salvaging today. Each component you rescue is a step toward sustainable electronics and a deeper understanding of how devices work. Keep practicing, and soon you’ll have a collection of parts ready for your next big project.


