 ALLPCB


Are you ready to dive into an exciting DIY game console PCB project? Building your own gaming device is not only a rewarding challenge but also a fantastic way to learn about electronics and custom PCB design. In this comprehensive guide, we'll walk you through the entire process of creating a portable game console from scratch. From the initial concept to soldering components onto your PCB and testing its functionality for gaming, we've got you covered with actionable steps and detailed insights. Whether you're a hobbyist or an aspiring engineer, this guide will help you build a unique gaming device tailored to your vision.
Why Build Your Own Portable Game Console?
Creating a portable game console as a DIY project offers a hands-on way to understand electronics, programming, and design. Unlike off-the-shelf devices, a custom-built console lets you control every aspect— from the hardware specifications to the games it plays. Plus, it’s a budget-friendly alternative to commercial products if you’re resourceful with components. This project is perfect for anyone interested in retro gaming, custom PCB design steps, or simply exploring the world of DIY electronics.
Step 1: Planning Your DIY Game Console PCB Project
Before you pick up a soldering iron, planning is crucial for a successful build. Start by defining the purpose and features of your gaming device. Are you aiming for a retro-style console to play 8-bit games, or do you want something more modern with higher processing power? For this guide, we’ll focus on a simple retro-style portable console capable of running basic games.
Here are the key considerations during planning:
- Core Components: Decide on a microcontroller or single-board computer as the brain of your console. A popular choice for beginners is a microcontroller with enough processing power to handle simple games, like one with a clock speed of around 16 MHz.
- Display: Choose a small OLED or LCD screen (e.g., a 2.8-inch display with 240x320 resolution) for portability and power efficiency.
- Input Controls: Plan for buttons or a small joystick for gameplay. Typically, 4-6 buttons are sufficient for retro games.
- Power Supply: Opt for a rechargeable lithium-ion battery (e.g., 3.7V, 1000mAh) to keep your console portable.
- Storage: Include a slot for a microSD card to store games and firmware.
Once you’ve outlined the features, sketch a rough layout of how the components will connect. This will guide your custom PCB design steps later.
Step 2: Designing the Custom PCB for Your Gaming Device
Designing a PCB (Printed Circuit Board) is the heart of this DIY game console PCB project. The PCB acts as the foundation where all components are mounted and connected. Here’s how to approach the custom PCB design steps:
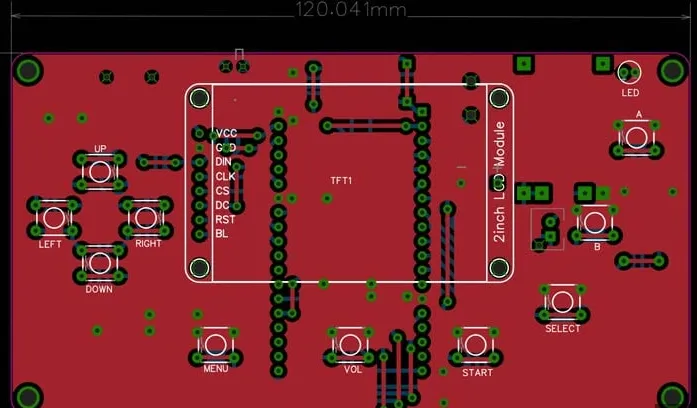
- Schematic Design: Use PCB design software to create a schematic. This is a blueprint showing how components like the microcontroller, display, and buttons connect. Ensure proper pin connections and include resistors (e.g., 10kΩ for pull-up/pull-down) to stabilize inputs.
- Component Placement: Lay out the components on the PCB with attention to spacing. Keep high-speed signal traces (if any) short to minimize interference. For instance, place the microcontroller near the display driver to reduce signal delay.
- Routing: Route the electrical traces between components. Aim for a ground plane to reduce noise, especially important for a gaming device where stable power is key.
- Design Rules Check (DRC): Run a DRC in your software to catch errors like overlapping traces or insufficient clearance (e.g., maintain at least 0.2mm clearance for 5V lines).
After finalizing the design, export the Gerber files needed for manufacturing. Partnering with a reliable PCB fabrication service ensures your board is produced with precision, ready for the next steps in building your own gaming device.
Step 3: Gathering Components for Your Portable Console
With your PCB design ready, it’s time to source the components. Here’s a list of essential parts for a basic portable game console:
- Microcontroller (e.g., 16-bit or 32-bit with at least 16 MHz speed)
- Small display module (e.g., 2.8-inch TFT LCD)
- Push buttons (4-6 for controls)
- Rechargeable battery and charging circuit (3.7V, 1000mAh)
- MicroSD card slot for game storage
- Audio output (small speaker or headphone jack)
- Miscellaneous resistors, capacitors, and connectors
Order these components from trusted electronics suppliers. Double-check datasheets to ensure compatibility, such as matching voltage requirements (e.g., 3.3V or 5V logic levels) between the microcontroller and peripherals.
Step 4: Soldering Components onto Your PCB
Soldering components onto your PCB is a critical step in building your own gaming device. Proper soldering ensures reliable connections and prevents issues like short circuits. Follow these tips for soldering components on a PCB:
- Prepare Your Workspace: Use a well-lit area with a soldering iron (25-40W for hobbyists), solder wire (0.8mm diameter, 60/40 tin-lead), flux, and a desoldering tool for corrections.
- Start with Low-Profile Components: Solder resistors and capacitors first, as they sit close to the board. Heat the pad and component lead for 2-3 seconds, then apply solder until it forms a shiny cone.
- Move to Larger Components: Install the microcontroller, display connector, and buttons. Be cautious with heat-sensitive parts—don’t exceed 300°C for more than 5 seconds per joint.
- Inspect Joints: Look for cold solder joints (dull, cracked appearance) and reflow them if needed. Ensure no solder bridges form between adjacent pads.
- Clean the Board: Use isopropyl alcohol and a brush to remove flux residue, which can cause corrosion over time.
Patience is key during soldering. Rushing can lead to mistakes, so take your time to achieve clean, strong connections.
Step 5: Programming Your Game Console
Once the hardware is assembled, it’s time to bring your console to life with software. Programming involves writing firmware to handle inputs, display graphics, and run games. Here’s how to proceed:
- Choose a Development Environment: Use a platform compatible with your microcontroller. Many hobbyists opt for open-source IDEs that support C or C++.
- Write Basic Firmware: Start with code to initialize the display and read button inputs. Test a simple loop that changes the screen color when a button is pressed.
- Add Game Logic: Program a basic game, like a pixelated maze or pong. Use libraries if available to handle graphics rendering at 30 frames per second for smooth gameplay.
- Store Games: Implement microSD card reading to load game data or multiple titles.
Upload the firmware to your microcontroller via a USB programmer or bootloader. Test each feature incrementally to catch bugs early.
Step 6: Testing PCB Functionality for Gaming
Testing PCB functionality for gaming ensures your console works as intended. A systematic approach helps identify and fix issues before final assembly. Follow these steps for thorough testing:
- Power-On Test: Connect the battery and check if the board powers up. Use a multimeter to verify voltages at key points (e.g., 3.3V or 5V at the microcontroller pins).
- Input Test: Press each button and confirm the microcontroller registers the input. If a button fails, inspect solder joints or check for incorrect wiring.
- Display Test: Run a test pattern or simple graphic on the screen. Look for flickering or dead pixels, which could indicate poor connections or driver issues.
- Gameplay Test: Load a game and play for at least 10-15 minutes. Monitor for lag (response time should be under 50ms for inputs) or unexpected crashes, which might point to firmware bugs or power instability.
- Battery Life Test: Measure how long the console runs on a full charge. A 1000mAh battery should provide 2-3 hours of gameplay, depending on power draw.
If issues arise during testing, trace them back to the hardware or software. For hardware faults, recheck solder joints and component placement. For software, debug the code line by line to isolate errors.
Step 7: Assembling the Portable Console Enclosure
With the PCB tested and functional, design an enclosure to house your gaming device. A good enclosure protects the electronics and enhances portability. You can create a custom case using 3D printing or repurpose a small plastic box. Ensure the design includes:
- Cutouts for the display, buttons, and ports
- Secure mounting for the PCB and battery
- Ventilation holes to prevent overheating
Assemble the components into the enclosure, securing them with screws or adhesive. Test the console again after assembly to ensure nothing shifts or disconnects during use.
Step 8: Final Touches and Personalization
Now that your portable game console is functional, add personal touches. Paint the enclosure, add decals, or customize the firmware with a unique boot screen. Load additional games onto the microSD card to expand your library. This step is all about making the device truly yours.
Tips for Success in Your DIY Game Console PCB Project
Building your own gaming device can be challenging, but these tips will help ensure success:
- Start simple—begin with basic games and features before scaling up to complex designs.
- Keep detailed notes during design and testing to track what works and what doesn’t.
- Join online communities for DIY electronics to share ideas and troubleshoot problems.
- Double-check all connections before powering on to avoid damaging components.
Conclusion: Enjoy Your Custom-Built Portable Game Console
Congratulations on completing your DIY game console PCB project! By following these custom PCB design steps, soldering components onto your PCB, and testing its functionality for gaming, you’ve built a unique portable gaming device from scratch. This hands-on journey not only results in a functional console but also equips you with valuable skills in electronics and design. Whether you’re playing retro classics or creating new games, your custom-built device is a testament to creativity and perseverance. Keep experimenting, refining, and expanding your project to take your skills to the next level.


