Overview
Learn how Docker can improve the way you build, test, and deploy Go web applications, and how to use Semaphore for continuous deployment.
Introduction
Go applications are often compiled into a single binary, while web applications also include templates and configuration files. When a project contains many files, missing files or mismatches between environments can cause errors and operational issues.
In this tutorial you will learn how to deploy a Go web application with Docker and how Docker can improve your development workflow and deployment process. Teams of various sizes can benefit from the setup described here.
Goals
- Gain a basic understanding of Docker
- See how Docker helps develop Go applications
- Learn how to create a Docker container for a production Go application
- Know how to use Semaphore to continuously deploy Docker containers to a server
Prerequisites
- Docker installed on your host or server
- A server configured to authenticate SSH requests using an SSH key pair
Understanding Docker
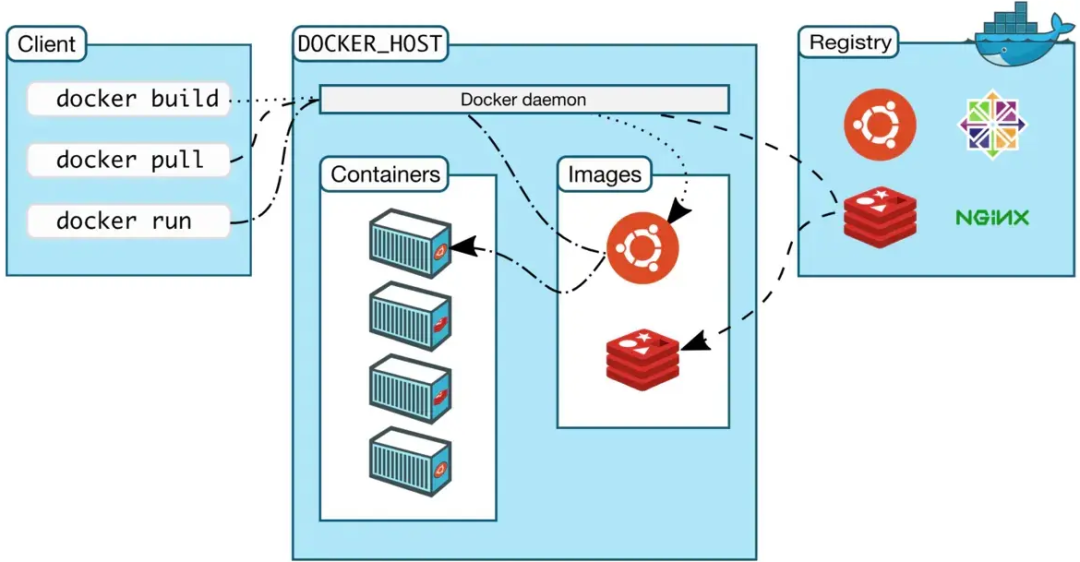
Docker helps you package an application into a single deployable unit called a container. A container includes the application code (or binary), runtime environment, system tools, and libraries. Packaging all required resources into one unit ensures the environment is identical regardless of where the application is deployed. This also helps maintain consistency between development and production configurations.
Once started, container creation and deployment can be automated. Docker eliminates a class of problems caused by missing files or differences between development and production environments.
Advantages Compared to Virtual Machines
Containers provide resource allocation and isolation similar to virtual machines, but differ in key ways. Virtual machines require a guest operating system while containers share the host kernel. Containers are therefore lighter weight and require fewer resources, with much faster startup times compared to VMs.
Benefits of Using Docker in Development
- A standard development environment for all team members
- Centralized dependency management and identical containers usable anywhere
- Identical environments for development and production
- Ability to catch issues that might only appear in production
Why Run a Go Web Application with Docker?
Go applications are often simple binaries, so you might ask why use Docker. Reasons include:
- Web applications typically include templates and configuration files; Docker helps keep these files in sync with the binary
- Docker ensures identical configuration in development and production, reducing environment-related failures
- In large teams, hosts, operating systems, and installed software can vary significantly; Docker provides a mechanism to ensure consistent development environments
Creating a Simple Go Web Application
For demonstration, this tutorial uses a simple Go web application called MathApp. The app:
- Exposes routes for different math operations
- Uses HTML templates for views
- Uses a configuration file to customize the app
- Includes unit tests for selected functions
Accessing /sum/3/6 shows a page with the sum of 3 and 6. Accessing /product/3/6 shows the product.
This example uses the Beego framework, though any framework (or none) will work for your application.
Final Directory Structure
MathApp ├── conf │ └── app.conf ├── main.go ├── main_test.go └── views ├── invalid-route.html └── result.html
Assume the MathApp directory is located at /app.
Application Files
The main application file main.go contains the application logic:
// main.go package main import ( "strconv" "github.com/astaxie/beego" ) // The main function defines a single route, its handler // and starts listening on port 8080 (default port for Beego) func main() { /* This would match routes like the following: /sum/3/5 /product/6/23 ... */ beego.Router("/:operation/int/int", &mainController{}) beego.Run() } // This is the controller that this application uses type mainController struct { beego.Controller } // Get() handles all requests to the route defined above func (c *mainController) Get() { // Obtain the values of the route parameters defined in the route above operation := c.Ctx.Input.Param(":operation") num1, _ := strconv.Atoi(c.Ctx.Input.Param(":num1")) num2, _ := strconv.Atoi(c.Ctx.Input.Param(":num2")) // Set the values for use in the template c.Data["operation"] = operation c.Data["num1"] = num1 c.Data["num2"] = num2 c.TplName = "result.html" // Perform the calculation depending on the 'operation' route parameter switch operation { case "sum": c.Data["result"] = add(num1, num2) case "product": c.Data["result"] = multiply(num1, num2) default: c.TplName = "invalid-route.html" } } func add(n1, n2 int) int { return n1 + n2 } func multiply(n1, n2 int) int { return n1 * n2 }
Tests
Tests for the functions in main.go are in main_test.go:
// main_test.go package main import "testing" func TestSum(t *testing.T) { if add(2, 5) != 7 { t.Fail() } if add(2, 100) != 102 { t.Fail() } if add(222, 100) != 322 { t.Fail() } } func TestProduct(t *testing.T) { if multiply(2, 5) != 10 { t.Fail() } if multiply(2, 100) != 200 { t.Fail() } if multiply(222, 3) != 666 { t.Fail() } }
Automated tests are useful for continuous deployment: with sufficient test coverage you can deploy continuously with more confidence.
View Templates
View templates are HTML files used to render responses. result.html:
MathApp - {{.operation}} The {{.operation}} of {{.num1}} and {{.num2}} is {{.result}}
invalid-route.html:
MathApp Invalid operation
Configuration File
app.conf is used by Beego to configure the application:
; app.conf appname = MathApp httpport = 8080 runmode = dev
Fields:
- appname: the process name of the application
- httpport: the port the application listens on
- runmode: the mode the application runs in; valid values include dev and prod
Using Docker in Development
This section describes the benefits of using Docker during development and shows the required steps.
Configure Docker for Development
We will use a Dockerfile with these development requirements:
- Use the MathApp created above
- Files must be accessible inside and outside the container
- Use Beego's bee tool to auto-reload the app inside the container during development
- Expose port 8080 from the container
- On the host, the app is at /app/MathApp
- In the container, the app is at /go/src/MathApp
- Development image name: ma-image
- Development container name: ma-instance
Step 1 - Create Dockerfile
FROM golang:1.6 # Install beego and the bee dev tool RUN go get github.com/astaxie/beego && go get github.com/beego/bee # Expose the application on port 8080 EXPOSE 8080 # Set the entry point of the container to the bee command that runs the # application and watches for changes CMD ["bee", "run"]
FROM golang:1.6 uses the official Go image with Go 1.6 and GOPATH set to /go.
RUN go get installs the Beego package and the bee tool. EXPOSE 8080 opens the port. CMD starts bee in watch mode.
Step 2 - Build the image
docker build -t ma-image .
This creates an image named ma-image. Use docker images to list images.
Step 3 - Run the container
docker run -it --rm --name ma-instance -p 8080:8080 -v /app/MathApp:/go/src/MathApp -w /go/src/MathApp ma-image
Command breakdown:
- docker run: start a container from an image
- -it: interactive mode
- --rm: remove the container when it exits
- --name ma-instance: assign a name
- -p 8080:8080: map host port 8080 to container port 8080
- -v /app/MathApp:/go/src/MathApp: bind mount the host project into the container
- -w /go/src/MathApp: set working directory
- ma-image: the image to run
When the container starts, bee will watch source files and rebuild/restart the app on changes. Example console output:
bee :1.4.1 beego :1.6.1 Go :go version go1.6 linux/amd64 2016/04/10 13:15 [INFO] Uses 'MathApp' as 'appname' 2016/04/10 13:15 [INFO] Initializing watcher... 2016/04/10 13:15 [TRAC] Directory(/go/src/MathApp) 2016/04/10 13:15 [INFO] Start building... 2016/04/10 13:18 [SUCC] Build was successful 2016/04/10 13:18 [INFO] Restarting MathApp ... 2016/04/10 13:18 [INFO] ./MathApp is running... 2016/04/10 13:18 [asm_amd64.s:1998][I] http server Running on :8080
To verify, visit http://localhost:8080/sum/4/5 (assuming you are using the local host).
Step 4 - Develop the application
With the container running, edit main.go. For example, change the line:
c.Data["operation"] = operation
to:
c.Data["operation"] = "real " + operation
Saving the file triggers bee to rebuild and restart the app. Console example:
2016/04/10 13:51 [EVEN] "/go/src/MathApp/main.go": MODIFY 2016/04/10 13:51 [SKIP] "/go/src/MathApp/main.go": MODIFY 2016/04/10 13:52 [INFO] Start building... 2016/04/10 13:56 [SUCC] Build was successful 2016/04/10 13:56 [INFO] Restarting MathApp ... 2016/04/10 13:56 [INFO] ./MathApp is running... 2016/04/10 13:56 [asm_amd64.s:1998][I] http server Running on :8080
Refresh the browser at http://localhost:8080/sum/4/5 to see the change.
Using Docker in Production
This section describes deploying the Go application in a Docker container. Semaphore will be used to:
- Automatically build when changes are pushed to the git repository
- Automatically run tests
- If build and tests pass, create a Docker image
- Push the Docker image to Docker Hub
- Update the server to use the latest Docker image
Create a Production Dockerfile
Project structure during development:
MathApp ├── conf │ └── app.conf ├── main.go ├── main_test.go └── views ├── invalid-route.html └── result.html
Create a Dockerfile at the project root. New structure:
MathApp ├── conf │ └── app.conf ├── Dockerfile ├── main.go ├── main_test.go └── views ├── invalid-route.html └── result.html
Dockerfile contents:
FROM golang:1.6 RUN mkdir /app ADD MathApp /app/MathApp ADD views /app/views ADD conf /app/conf WORKDIR /app EXPOSE 8080 ENTRYPOINT /app/MathApp
Explanation:
- FROM golang:1.6: base image
- RUN mkdir /app: create application directory
- ADD ...: copy binary, views, and config into the image
- WORKDIR /app: set working directory
- EXPOSE 8080: expose port used by app.conf
- ENTRYPOINT /app/MathApp: start the application binary
Automated Build and Test
Once code is pushed to your repository, Semaphore can automatically build and test the code. A typical Go project configuration on Semaphore performs:
- Fetch dependencies
- Build
- Run tests
If build or tests fail, deployment stops.
Initial Semaphore Setup for Deployment
To deploy, the pipeline needs to:
- Create a Docker image
- Push the image to Docker Hub
- Pull the new image on the server and start a new container from it
On Semaphore, configure the project for continuous deployment. Basic steps:
- Select deployment mode
- Select deployment strategy
- Select the repository branch to deploy
Provide deployment commands in the project settings and add the SSH private key for the server user so Semaphore can execute remote commands without a password. You can also name the server; Semaphore assigns a default name if left blank.
Server Update Script
On the server, place a script named update.sh to perform the update process:
#!/bin/bash docker pull $1/ma-prod:latest if docker stop ma-app; then docker rm ma-app; fi docker run -d -p 8080:8080 --name ma-app $1/ma-prod if docker rmi $(docker images --filter "dangling=true" -q --no-trunc); then :; fi
Make it executable:
chmod +x update.sh
Usage example:
./update.sh docker_hub_username
Script behavior:
- docker pull $1/ma-prod:latest: pull the latest image from Docker Hub (replace $1 with Docker Hub username)
- Stop and remove any existing ma-app container
- Run a new ma-app container from the pulled image and map port 8080
- Clean up dangling images
Note: store update.sh in the home directory of the user associated with the SSH key used by Semaphore; otherwise update deployment commands accordingly.
Configure Semaphore to Support Docker
Semaphore's default platform may not include Docker. Select a platform that supports Docker (for example, an Ubuntu image with Docker support) in the project settings.
Set Environment Variables
To authenticate against Docker Hub during deployment, store credentials in Semaphore environment variables:
- DH_USERNAME - Docker Hub username
- DH_PASSWORD - Docker Hub password
- DH_EMAIL - Docker Hub email
Set Deploy Commands
Enter the following deploy commands in Semaphore's server deploy commands section, replacing placeholders as needed:
go get -v -d ./ go build -v -o MathApp docker login -u $DH_USERNAME -p $DH_PASSWORD -e $DH_EMAIL docker build -t ma-prod . docker tag ma-prod:latest $DH_USERNAME/ma-prod:latest docker push $DH_USERNAME/ma-prod:latest ssh -oStrictHostKeyChecking=no your_server_username@your_ip_address "~/update.sh $DH_USERNAME"
Notes:
- Replace your_server_username@your_ip_address with the actual server SSH user and address
- go get and go build fetch dependencies and compile the binary; the binary name must match the ENTRYPOINT used in the Dockerfile
- docker login uses environment variables for Docker Hub authentication
- docker build creates the image, docker tag prepares it for Docker Hub, and docker push uploads it
- ssh executes update.sh on the server to pull the image and restart the container
Deploying the Application
After configuration, pushing changes to the repository triggers Semaphore to build, test, and, if successful, deploy. You can also trigger a manual deployment to verify the setup. Once deployed, refresh the page. The result should match what you saw during development, with the server IP replacing localhost.
Testing the Configuration
To verify the end-to-end workflow, make a small change, commit, and push:
git add views/result.html git commit -m "Change the color of text from black (default) to red" git push origin master
Semaphore will detect the change, run the build and tests, and if successful, deploy the updated image. Monitor the Semaphore dashboard for real-time build and deployment status. After the pipeline completes, refresh the application URL to confirm the change.
Summary
This tutorial explained how to create Docker containers for a Go application and how to use Semaphore to build and deploy those containers to a server. You should now be able to use Docker to simplify Go application deployment workflows.
 ALLPCB


