ALLPCB


Are you looking to create high-density interconnects (HDI) on your printed circuit boards (PCBs) without breaking the bank? DIY laser drilling for PCBs offers a path to craft microvias—tiny holes that connect layers in a PCB—at home or in a small workshop. In this guide, we’ll walk you through the process of building your own laser microvia machine, making affordable laser drilling for PCBs a reality. Whether you’re exploring open-source laser PCB drilling projects or just starting with laser PCB drilling ideas, this blog will provide actionable steps and insights to get you started.
What Is Laser Drilling for PCBs and Why Do It Yourself?
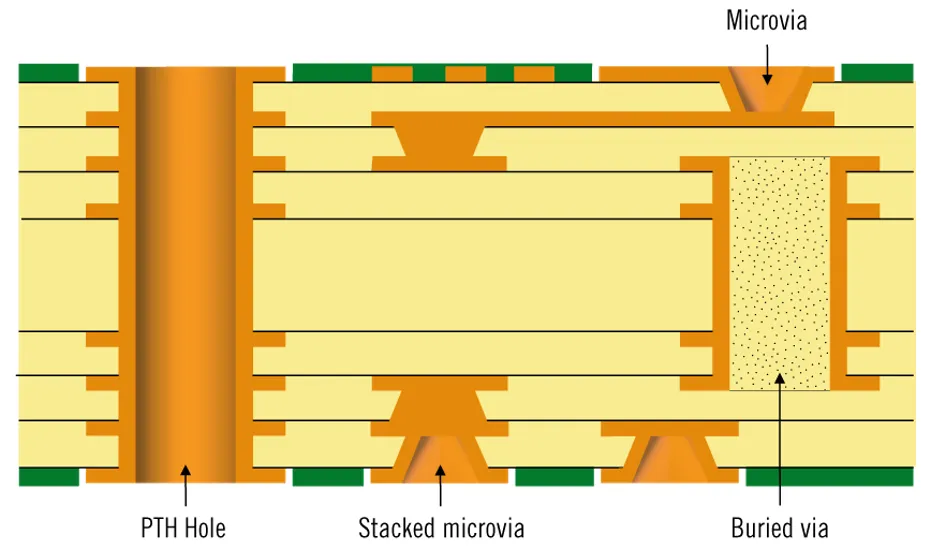
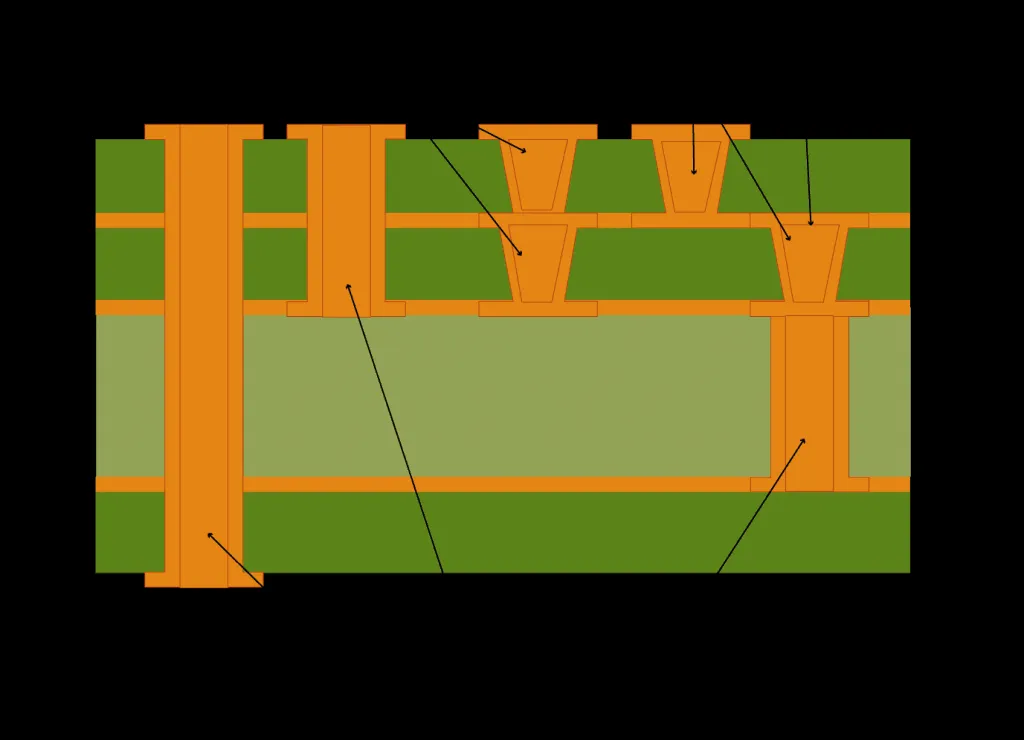
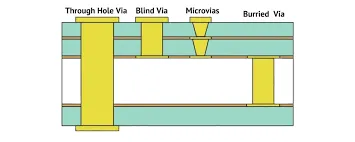
Laser drilling is a technique used to create small, precise holes, known as microvias, in PCBs. These microvias, often less than 150 micrometers in diameter, allow for tighter routing of electrical connections in compact, multilayer boards. Unlike traditional mechanical drilling, laser drilling offers higher precision and reduces the risk of damaging delicate PCB materials. For hobbyists and small-scale engineers, building a DIY laser drilling setup can save costs compared to outsourcing and gives you full control over your projects.
Benefits of DIY Laser Drilling for PCBs
Creating your own laser microvia maker comes with several advantages:
- Cost-Effective: Professional laser drilling services can be expensive, often costing hundreds of dollars per board for complex designs. A DIY setup can be built for a fraction of that price.
- Customization: You can tweak your machine to suit specific project needs, such as adjusting laser power for different materials.
- Learning Opportunity: Building a laser drilling machine teaches you about optics, electronics, and PCB fabrication processes.
- Community Support: Open-source laser PCB drilling projects provide access to shared designs, code, and troubleshooting tips from fellow makers.
Understanding Microvias and Their Importance
Microvias are critical in modern PCB designs, especially for HDI boards used in smartphones, wearables, and other compact devices. These tiny holes, often ranging from 50 to 150 micrometers, enable layer-to-layer connections without taking up much space. They also improve signal integrity by reducing impedance—often to values below 50 ohms in high-frequency applications—and boosting signal speeds up to several gigahertz in some designs. Laser drilling is the preferred method for creating microvias because it can achieve such small diameters with minimal material damage.
Challenges of DIY Laser Drilling for PCBs
Before diving into building your own machine, it’s important to understand the hurdles:
- Safety Risks: Lasers can cause eye damage or burns if mishandled. Proper safety gear and enclosures are non-negotiable.
- Precision Requirements: Achieving consistent microvia sizes below 100 micrometers requires stable equipment and fine-tuned settings.
- Material Limitations: Not all PCB substrates work well with lasers. For instance, FR-4 material can char if the laser power isn’t carefully controlled.
Components Needed to Build Your Own Laser Microvia Machine
Building an affordable laser drilling setup for PCBs requires gathering the right components. Here’s a list of essentials to get started:
- Laser Module: A fiber or UV laser with a power output of 5-20 watts is ideal for cutting through copper and dielectric layers. These lasers can often be sourced from industrial surplus or online marketplaces for $200-500.
- Focusing Lens: A lens to concentrate the laser beam to a fine point, ensuring holes as small as 50 micrometers.
- Motion Control System: Stepper motors and a CNC frame to position the laser precisely over the PCB. Kits for small CNC machines can be found for around $100-300.
- Controller Board: A microcontroller like an Arduino or Raspberry Pi to manage laser firing and movement. These are widely available for $20-50.
- Power Supply: A stable power source matching your laser’s requirements, typically 12-24 volts.
- Safety Enclosure: A protective box with laser-safe acrylic to shield users from stray beams. Budget builds can use repurposed materials costing under $50.
- Software: Open-source options like GRBL for controlling CNC movement or custom scripts for laser timing.
Step-by-Step Guide to Building Your DIY Laser Drilling Machine
Now that you have your components, let’s walk through the process of assembling an affordable laser drilling PCB setup.
Step 1: Assemble the CNC Frame
Start by building or setting up a small CNC frame using a kit or 3D-printed parts. Ensure the frame is sturdy, as vibrations can affect drilling accuracy. Mount the stepper motors to control X and Y axes for precise positioning over the PCB. Test the movement range to cover at least a 10x10 cm area, which is sufficient for most hobbyist boards.
Step 2: Mount the Laser Module
Attach the laser module to the Z-axis of your CNC frame. Add a focusing lens to narrow the beam to a spot size of about 50-100 micrometers. Secure all connections and ensure the laser can move smoothly without loose wires interfering.
Step 3: Wire the Electronics
Connect the laser and stepper motors to your controller board. Use a power supply that matches the laser’s voltage and current needs—often around 12V and 2-3A for smaller modules. Program the controller with open-source software to sync laser firing with movement.
Step 4: Build a Safety Enclosure
Construct a box around the setup using laser-safe materials. Ensure no light escapes during operation. Add a safety interlock switch to shut off the laser if the enclosure is opened.
Step 5: Test and Calibrate
Run initial tests on scrap PCB material. Adjust the laser power and focus to drill holes without burning the surrounding area. Aim for a hole diameter of 75-150 micrometers, which is standard for microvias. Measure the results with a digital microscope if possible to confirm accuracy.

Software for Open-Source Laser PCB Drilling
Software plays a big role in controlling your DIY setup. Open-source tools can help you design via layouts and program drilling paths:
- GRBL: A free firmware for CNC control, compatible with many microcontroller boards. It handles precise movement for drilling multiple vias.
- Inkscape with Extensions: Use this for creating drill patterns. Extensions like Gcodetools convert designs into machine-readable paths.
- Custom Scripts: For advanced users, Python scripts can automate laser timing and power adjustments based on material thickness.
Tips for Successful DIY Laser Drilling Projects
To ensure your laser PCB drilling projects go smoothly, keep these pointers in mind:
- Start Small: Begin with single-layer or double-layer boards before moving to complex multilayer designs.
- Monitor Heat: Excessive laser power can cause charring on FR-4 substrates. Use short pulses (e.g., 1-2 milliseconds) to minimize heat buildup.
- Use Proper Ventilation: Drilling releases fumes from burning materials. Work in a well-ventilated area or use a fume extractor.
- Check Alignment: Misaligned lasers can create uneven holes. Regularly verify the beam’s focus and position.
Exploring Open-Source Laser PCB Drilling Communities
One of the best ways to improve your skills and troubleshoot issues is by joining communities focused on open-source laser PCB drilling. Online forums and social media groups often share free designs, software tweaks, and build logs. These platforms are goldmines for inspiration and practical advice on refining your microvia maker.
Cost Breakdown of Building Your Own Laser Microvia Machine
Here’s a rough estimate of what you might spend on an affordable laser drilling PCB setup:
- Laser Module: $200-500
- CNC Frame and Motors: $100-300
- Controller Board: $20-50
- Focusing Lens and Accessories: $30-70
- Safety Enclosure Materials: $30-50
- Total: $380-970
While the upfront cost may seem high, it’s a one-time investment that pays off by eliminating recurring fees for professional drilling services.
Scaling Up Your DIY Laser Drilling Setup
Once you’ve mastered the basics, consider upgrading your machine for larger or more complex projects. Adding a more powerful laser (up to 40 watts) can handle thicker boards, while integrating a higher-precision motion system can improve accuracy to within 10 micrometers. You might also explore automated loading systems for batch processing multiple PCBs.
Conclusion: Start Your Laser PCB Drilling Journey Today
Building your own laser microvia maker is an exciting and rewarding endeavor for any PCB enthusiast. With a DIY laser drilling setup, you can create intricate HDI designs at a fraction of the cost of commercial services. From gathering components to fine-tuning your machine, every step offers a chance to learn and innovate. Whether you’re working on personal projects or contributing to open-source laser PCB drilling initiatives, this guide provides the foundation to get started. Dive into the world of affordable laser drilling for PCBs and see how far your creativity can take you!