 ALLPCB


Hand soldering can be tricky, especially when standard soldering iron tips don’t meet the needs of a unique project. Whether you're working on intricate electronics, surface-mount components, or large-scale repairs, creating custom solder tips or adapting your soldering iron can make a huge difference. In this guide, we’ll walk you through the process of crafting diy solder tips, designing custom soldering iron tips, and adapting soldering iron setups to tackle even the most challenging tasks.
From understanding why custom tips are necessary to step-by-step instructions for making your own, this blog covers everything you need to know. Let’s dive into the world of personalized soldering solutions and help you achieve precision and efficiency in your work.
Why Custom Solder Tips Matter for Hand Soldering
Soldering is a fundamental skill in electronics, but not every job can be done with a one-size-fits-all tip. Standard tips often fall short when you’re dealing with tiny surface-mount devices (SMDs), oddly shaped components, or heavy-duty connections requiring more heat transfer. Custom solder tips allow you to adapt your tools to the specific demands of your project, saving time and improving results.
For instance, a fine conical tip might be perfect for delicate SMD soldering, but it won’t work well for desoldering large through-hole components. Similarly, a wide chisel tip is great for heat-intensive tasks but can damage small traces. By creating or modifying tips, you gain control over the shape, size, and thermal properties of your soldering iron, ensuring it matches the job at hand.
Common Challenges in Hand Soldering
Before we explore solutions, let’s look at some common hand soldering challenges that often require custom solutions:
- Tight Spaces: Working on densely packed circuit boards where standard tips can’t reach.
- Heat Distribution: Needing to apply heat evenly to large or irregular components without damaging nearby parts.
- Specialized Components: Soldering unique or non-standard parts that require a specific tip shape.
- Durability: Standard tips wearing out quickly under heavy use or high temperatures.
Custom tips can address these issues, giving you the flexibility to handle any soldering challenge with confidence.
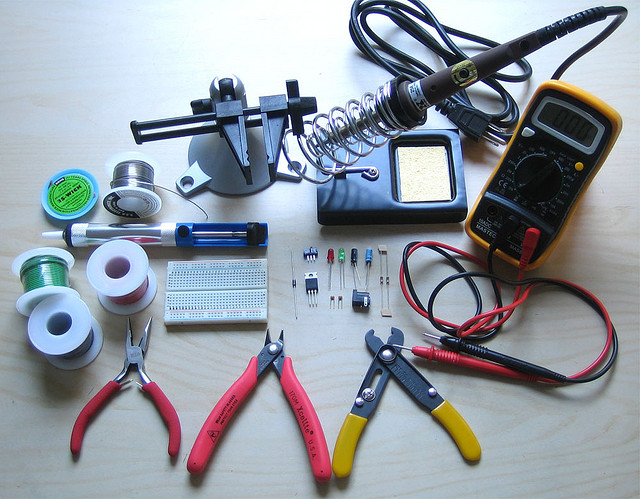
Materials and Tools for Creating DIY Solder Tips
Creating diy solder tips doesn’t require advanced equipment or expensive materials. With a few common items, you can craft tips that suit your specific needs. Here’s what you’ll need:
- Copper Wire or Rods: Copper is an excellent conductor of heat, making it a popular choice for custom tips. Use 6 AWG or thicker copper wire for durability and effective heat transfer.
- Metal Files and Sandpaper: For shaping and smoothing your custom tip to the desired form.
- Cutting Tools: Wire cutters or a hacksaw to cut copper or other materials to size.
- Drill or Hammer: To create mounting holes or flatten the material for specific tip designs.
- Soldering Iron Base: Your existing soldering iron to test and mount the custom tip.
- Protective Gear: Safety glasses and gloves to protect yourself while cutting and shaping metal.
Copper is often the go-to material due to its thermal conductivity (around 401 W/m·K), which ensures quick and even heat distribution. However, for heavy-duty tasks, you might consider brass or even steel, though they have lower thermal conductivity (109 W/m·K for brass and 50 W/m·K for steel) and may require more time to heat up.
Step-by-Step Guide to Crafting Custom Soldering Iron Tips
Now that you have your materials ready, let’s go through the process of creating custom soldering iron tips. Follow these steps to build a tip tailored to your project.
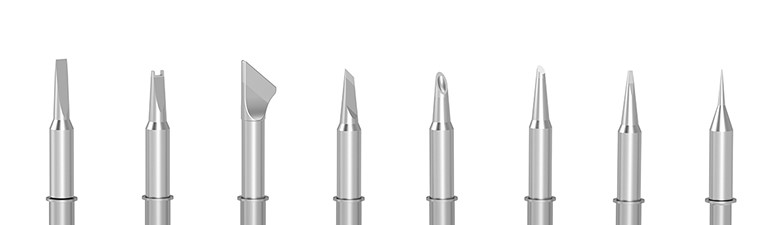
Step 1: Determine the Tip Shape and Size
Start by identifying the specific soldering challenge you’re facing. For example, if you’re working on SMD components, a fine, needle-like tip with a diameter of 0.5 mm or less might be ideal. For larger connections, a wider chisel tip of 3-5 mm could work better. Sketch out the shape and dimensions on paper to use as a guide.
Step 2: Cut the Material to Length
Using wire cutters or a hacksaw, cut a piece of copper wire or rod to a length of about 2-3 inches (5-7 cm). This length ensures enough material to shape the tip while leaving space to attach it to your soldering iron. Always wear safety gear during this step to avoid injury from metal shavings.
Step 3: Shape the Tip
Use a metal file or sandpaper to shape the copper into your desired form. For a fine tip, taper one end to a point. For a chisel tip, flatten the end and create a broad, flat surface. Work slowly and check your progress often to avoid over-shaping. If needed, use a drill to create small grooves or holes for specialized tasks like desoldering.
Step 4: Smooth and Polish
Once the shape is complete, smooth the surface with finer sandpaper (around 400-600 grit). A smooth tip prevents solder from sticking unevenly and ensures better heat transfer. Polishing also reduces the risk of damaging delicate components during soldering.
Step 5: Attach the Tip to Your Soldering Iron
Most soldering irons have a removable tip system. If your custom tip fits directly, secure it in place as you would a standard tip. If it doesn’t, you may need to drill a small hole in the base of the copper piece to match the mounting mechanism of your iron. Ensure a tight fit to maximize heat transfer—loose connections can lead to inefficient heating (potentially dropping the tip temperature by 50-100°C).
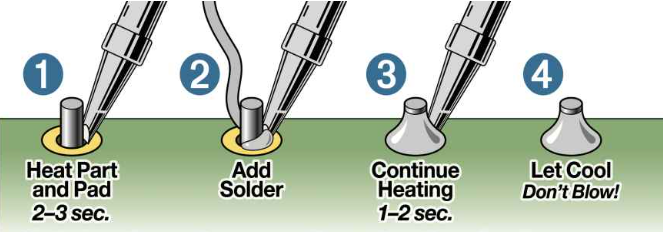
Step 6: Test and Tin the Tip
Turn on your soldering iron and let it heat up to operating temperature (typically 300-350°C for electronics work). Apply a thin layer of solder to the tip to “tin” it. This process protects the copper from oxidation and improves solder flow during use. If the tip doesn’t heat evenly, double-check the connection or consider using a different material or design.
Adapting Soldering Iron for Specific Challenges
Beyond creating new tips, adapting soldering iron setups can help you overcome unique hand soldering obstacles. Here are some practical ways to modify your tool for better performance.
Extending Reach with Long Tips
For projects requiring access to deep or tight spaces, standard tips might be too short. You can create a longer tip using a thicker gauge copper wire (like 16 AWG) to extend the reach by 6-8 inches (15-20 cm). Keep in mind that longer tips may lose heat due to the distance from the heating element, so test the temperature at the tip (aim for at least 250°C for effective soldering).
Improving Heat Transfer for Large Components
When soldering large connectors or heat sinks, you need a tip with greater thermal mass. Use a broader copper rod (around 8-10 mm in diameter) to retain more heat. This ensures consistent temperatures even when transferring heat to larger surfaces, preventing cold solder joints.
Specialized Tips for SMD Work
Surface-mount soldering often requires ultra-fine tips. If shaping a fine point isn’t enough, consider bending the tip slightly (about 15-30 degrees) to improve access to tiny pads. A tip diameter of 0.2-0.5 mm works best for most SMD tasks, allowing precise control without risking damage to adjacent components.
Tips for Maintaining and Optimizing Custom Solder Tips
Custom tips require regular care to ensure they perform well over time. Here are some maintenance tips to keep your diy solder tips in top condition:
- Clean Regularly: After each use, wipe the tip with a damp sponge or brass wire cleaner to remove excess solder and flux residue. This prevents buildup that can interfere with heat transfer.
- Re-Tin Frequently: Apply a fresh layer of solder to the tip after cleaning to protect it from oxidation. Copper tips, in particular, oxidize quickly at high temperatures (above 300°C).
- Avoid Overheating: If your soldering iron allows temperature control, set it to the lowest effective temperature for your task (typically 300-350°C for electronics). Excessive heat can degrade custom tips faster.
- Store Properly: Keep unused tips in a dry, clean container to prevent corrosion or damage.
By following these practices, you can extend the lifespan of your custom tips, often achieving 50-100 hours of use before needing replacement, depending on the material and workload.
Safety Considerations When Crafting and Using Custom Tips
Working with metals and high temperatures comes with risks. Keep these safety tips in mind while creating and using custom soldering iron tips:
- Wear Protective Gear: Always use safety glasses and gloves when cutting or shaping metal to avoid injury from sharp edges or flying debris.
- Work in a Ventilated Area: Soldering produces fumes, especially when using flux. Ensure proper ventilation to avoid inhaling harmful vapors.
- Handle Hot Tools Carefully: Custom tips can behave differently from standard ones in terms of heat retention. Use a soldering iron stand and avoid touching the tip until it cools down (which can take 5-10 minutes after powering off).
Advanced Techniques for Custom Soldering Challenges
For experienced users, there are advanced methods to further customize your soldering setup. These techniques can help with highly specialized tasks:
- Creating Multi-Function Tips: Design a tip with multiple working surfaces, such as a chisel on one side and a fine point on the other. This allows quick switching between tasks without changing tips.
- Using Alternative Materials: Experiment with brass or nickel-plated tips for better durability, though they may require higher wattage irons (60-80W) to maintain temperature due to lower thermal conductivity.
- Modifying Heat Elements: For extreme reach or heat needs, consider adapting the heating element itself, though this requires advanced skills and caution to avoid damaging the iron.
These advanced approaches can significantly enhance your soldering capabilities, especially for niche applications like circuit board repair or custom electronics design.
Conclusion: Mastering Hand Soldering with Custom Solutions
Creating diy solder tips and custom soldering iron tips is a game-changer for tackling unique hand soldering challenges. By adapting soldering iron setups to your specific needs, you gain precision, efficiency, and versatility in your work. Whether you’re crafting a fine tip for SMD soldering or a robust chisel for heavy-duty tasks, the ability to customize your tools empowers you to handle any project with confidence.
Start small by experimenting with copper wire and basic shapes, then refine your skills as you encounter new challenges. With the steps and tips provided in this guide, you’re well on your way to mastering the art of custom soldering solutions. Keep practicing, maintain your tools, and enjoy the satisfaction of perfectly soldered connections every time.


