 ALLPCB


Are you a hobbyist looking to dive into the world of electronics repair, specifically tackling BGA rework for beginners? Ball Grid Array (BGA) rework might seem intimidating at first, but with the right knowledge, tools, and techniques, you can repair or replace BGA components on printed circuit boards (PCBs) at home. In this comprehensive guide, we'll walk you through everything you need to know about DIY BGA rework, including essential BGA rework tools for hobbyists, basic BGA rework techniques, and even the BGA rework cost to help you budget your setup. Let's get started on this exciting journey to master electronics repair!
What is BGA Rework and Why Does It Matter?
BGA rework refers to the process of removing, repairing, or replacing a Ball Grid Array component on a PCB. Unlike traditional components with visible pins, BGA chips have tiny solder balls underneath, making them challenging to work with without specialized skills or equipment. These components are common in modern electronics like laptops, gaming consoles, and smartphones due to their compact size and high connection density.
For hobbyists, learning BGA rework opens up opportunities to fix expensive devices, salvage components, or even experiment with custom projects. Whether you're repairing a graphics chip on a laptop motherboard or upgrading a device, mastering DIY BGA rework can save you money and boost your technical skills.
Understanding the Basics of BGA Components
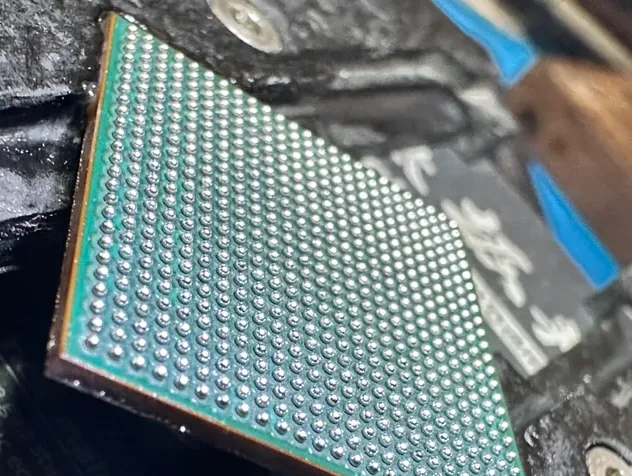
Before diving into BGA rework techniques, let’s break down what makes BGA components unique. A BGA package can have hundreds or even thousands of solder balls arranged in a grid pattern, each acting as a connection point to the PCB. These balls are typically made of a lead-free solder alloy and are only about 0.3 to 0.6 mm in diameter, requiring precision during rework.
The main challenge with BGA rework is that the connections are hidden beneath the chip, so you can't visually inspect or manually solder them with a regular soldering iron. Instead, you need tools that can heat the entire area evenly to reflow the solder without damaging the component or the board.
Essential BGA Rework Tools for Hobbyists
Getting started with BGA rework doesn’t mean you need to spend a fortune on professional equipment. There are affordable options tailored for hobbyists that can still get the job done. Here’s a list of essential BGA rework tools for hobbyists to build your DIY setup:
- Hot Air Rework Station: This is the cornerstone of any BGA rework setup. A hot air station uses controlled heat to melt solder, allowing you to remove or place BGA components. Look for a model with adjustable temperature (up to at least 400°C) and airflow settings. Budget-friendly options start at around $50–$100.
- Tweezers and Picks: Precision tweezers are crucial for handling small BGA chips and cleaning up excess solder. A set of anti-static tweezers costs about $5–$15.
- Flux: Flux helps the solder flow smoothly and prevents oxidation during heating. Water-soluble or no-clean flux pens are ideal for hobbyists and cost around $5–$10.
- Solder Balls and Stencils: If you’re reballing a BGA chip (replacing the solder balls), you’ll need a stencil specific to your chip and pre-sized solder balls. A basic stencil kit can cost $10–$20.
- Isopropyl Alcohol and Brushes: Cleaning the PCB and component after rework is vital to remove flux residue. A small bottle of 99% isopropyl alcohol and a brush set costs less than $10.
- Magnifying Glass or Microscope: Since BGA balls are tiny, a magnifying tool helps with inspection and alignment. A USB microscope can be found for $20–$40.
- Heat-Resistant Mat and Tape: Protect your workspace and nearby components with a silicone mat and heat-resistant tape. These items are inexpensive, often under $10 combined.
For hobbyists on a tight budget, starting with a basic hot air station and minimal accessories can keep your initial BGA rework cost under $100. As you gain experience, you can invest in more advanced tools like infrared rework stations or pre-heaters for better precision.

Basic BGA Rework Techniques for Beginners
Now that you have the tools, let’s explore some basic BGA rework techniques to help you get started. These methods focus on safety and simplicity, ensuring you don’t damage your PCB or components.
1. Preparation and Safety
Before starting any rework, prepare your workspace. Work in a well-ventilated area to avoid inhaling fumes from solder or flux. Wear safety glasses to protect your eyes from hot air or debris. Cover nearby components on the PCB with heat-resistant tape to shield them from accidental heat exposure.
2. Removing a BGA Component
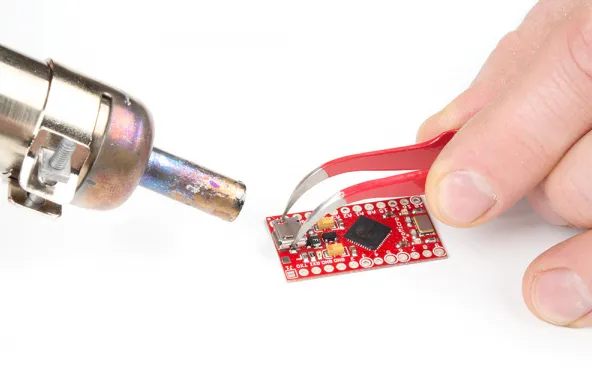
To remove a BGA chip, you’ll use your hot air station to reflow the solder balls underneath. Follow these steps:
- Set your hot air station to a temperature of around 350–400°C and medium airflow. Refer to the component’s datasheet for specific temperature recommendations if available.
- Apply flux around the edges of the BGA chip to help the solder melt evenly.
- Hold the hot air nozzle about 1–2 inches above the chip and move it in a circular motion to distribute heat evenly. This process usually takes 30–60 seconds.
- Once the solder melts, gently lift the chip with tweezers. Avoid forcing it off, as this can damage the PCB pads.
- Allow the board to cool, then clean the area with isopropyl alcohol and a brush to remove flux residue.
3. Cleaning and Reballing (Optional)
If you plan to reuse the BGA chip, you may need to reball it by replacing the old solder balls. Use a stencil matching the chip’s ball pattern, apply flux, and place new solder balls using the stencil. Heat the chip with your hot air station to attach the balls, keeping the temperature around 300°C for lead-free solder.
4. Placing a New BGA Component
To install a new or reballed BGA chip, align it carefully with the PCB pads. Apply flux to the pads, position the chip, and use your hot air station to reflow the solder. Heat for about 30–60 seconds until the solder melts and the chip settles into place. Let it cool naturally to avoid thermal shock.
Common Challenges in DIY BGA Rework and How to Overcome Them
As a beginner, you might face some hurdles during BGA rework. Here are common issues and tips to address them:
- Overheating the PCB: Excessive heat can warp the board or damage nearby components. Always use the lowest effective temperature and limit heating time. A pre-heater (if available) can help by warming the board evenly before using hot air.
- Misalignment of the Chip: Placing a BGA chip incorrectly can lead to poor connections. Use a magnifying tool to double-check alignment before reflowing, and ensure the PCB is on a flat surface.
- Damaged Pads: Lifting a BGA chip forcefully can tear off delicate pads on the PCB. Be patient when removing components, and if a pad is damaged, consider using thin wire and solder to repair it before reinstalling the chip.
BGA Rework Cost: Budgeting for Your Hobby
One of the biggest concerns for hobbyists is the BGA rework cost. While professional rework stations can cost thousands of dollars, a DIY setup for beginners is far more affordable. Here’s a breakdown of potential expenses:
- Basic Hot Air Station: $50–$100
- Flux, Tweezers, and Cleaning Supplies: $20–$30
- Solder Balls and Stencils (if reballing): $10–$20
- Magnifying Tool: $20–$40
- Optional Pre-Heater or Upgrades: $50–$150
In total, a starter kit for BGA rework for beginners can cost as little as $100–$150. As you grow more confident, investing in better tools can improve your results, but starting small keeps the hobby accessible. Remember, the skills you gain can save you hundreds or even thousands of dollars on repairs compared to professional services, which often charge $100–$300 per job.
Tips for Success in BGA Rework as a Hobbyist
To make your journey into DIY BGA rework smoother, keep these practical tips in mind:
- Practice First: Before working on a valuable device, practice on scrap PCBs or old electronics to build confidence with your tools and techniques.
- Research Your Component: Always check the datasheet or manufacturer guidelines for the specific BGA chip you’re working on to avoid using incorrect temperatures or methods.
- Stay Patient: Rushing through BGA rework can lead to mistakes. Take your time to ensure precision at every step.
- Document Your Work: Take photos or notes during the process to track what works and what doesn’t. This can be invaluable for future projects.
Why Choose DIY BGA Rework?
Learning BGA rework for beginners offers numerous benefits for hobbyists. Not only does it empower you to fix modern electronics that would otherwise be discarded, but it also deepens your understanding of how devices work at a fundamental level. Plus, the cost savings from avoiding professional repair services can quickly offset your initial investment in tools.
Whether you’re repairing a gaming console with a faulty graphics chip or experimenting with custom PCB designs, DIY BGA rework is a skill that pays off in both satisfaction and practicality. With the right BGA rework tools for hobbyists and a willingness to learn basic BGA rework techniques, you’re well on your way to becoming a capable electronics repair enthusiast.
Conclusion
BGA rework doesn’t have to be a daunting task reserved for professionals. With this guide on BGA rework for beginners, you now have a clear roadmap to start your journey as a hobbyist. From understanding the essentials of BGA components to assembling a budget-friendly toolkit and mastering basic techniques, you’re equipped to tackle electronics repair projects at home. Keep your BGA rework cost low by starting with affordable tools, and remember to practice patience and precision as you refine your skills.
Ready to take on your first DIY BGA rework project? Gather your tools, find a practice board, and dive into the rewarding world of electronics repair. With each successful rework, you’ll gain confidence and expertise to handle even more complex challenges down the road.


