 ALLPCB


In today’s fast-paced world of electronics, printed circuit boards (PCBs) are the backbone of countless devices, from smartphones to industrial machinery. When a PCB fails, the immediate instinct might be to replace it entirely. However, repairing a PCB can often be a more cost-effective and sustainable solution. This comprehensive guide will walk you through the essentials of PCB repair, helping you save money and extend the lifespan of your boards. Whether you're looking for a PCB repair guide, tips on fixing broken PCBs, or advice on component replacement for PCBs, this post covers it all with practical steps for DIY electronics repair.
Why Choose PCB Repair Over Replacement?
Repairing a PCB instead of replacing it offers several advantages. First, it can significantly reduce costs. A new PCB, especially for custom or complex designs, can be expensive, often ranging from $50 to several hundred dollars depending on the specifications. Repairing, on the other hand, might only require a few dollars in components and tools. Additionally, repairing helps reduce electronic waste, contributing to a more sustainable approach to electronics maintenance. Finally, fixing broken PCBs allows you to maintain the original design and functionality of your device, which is critical for older or specialized equipment where replacements may no longer be available.
In this blog, we’ll dive deep into the process of extending PCB lifespan through effective repair techniques. Let’s get started with the basics of identifying PCB issues and then move on to actionable repair methods.
Understanding Common PCB Problems
Before you can fix a PCB, you need to identify what’s wrong with it. PCBs can fail for a variety of reasons, and understanding these issues is the first step in any PCB repair guide. Here are some of the most common problems:
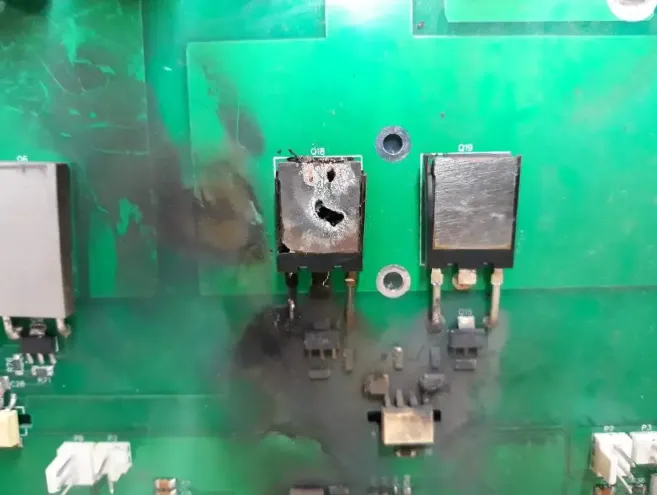
- Broken Traces: These are the copper pathways on a PCB that connect components. Physical damage or corrosion can cause traces to break, disrupting the flow of electricity. This often results in a device that powers on but doesn’t function correctly.
- Burnt Components: Overheating or power surges can cause components like resistors, capacitors, or ICs to burn out, often leaving visible black marks or a distinct burnt smell.
- Lifted Pads: Pads are the small copper areas where components are soldered. Excessive heat or mechanical stress can cause pads to lift off the board, breaking connections.
- Short Circuits: These occur when unintended connections form between traces or components, often due to solder bridges or damaged insulation, leading to erratic behavior or complete failure.
- Corrosion: Exposure to moisture or chemicals can corrode traces and components, weakening connections over time and causing intermittent issues.
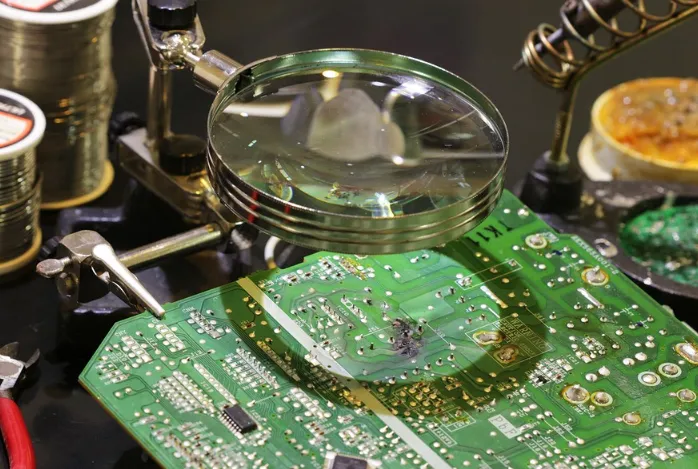
Identifying the specific issue requires a careful visual inspection, often aided by a magnifying glass or microscope, and sometimes a multimeter to test for continuity or voltage. Once you’ve pinpointed the problem, you can move on to fixing broken PCBs with the right tools and techniques.
Related Reading: Troubleshooting FR-4 PCB Problems: A Practical Guide
Essential Tools for DIY Electronics Repair
To repair a PCB effectively, having the right tools is crucial. Here’s a list of essential equipment for anyone looking to dive into DIY electronics repair:
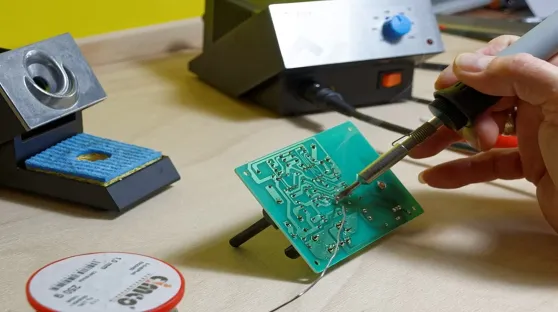
- Soldering Iron and Solder: A good soldering iron with adjustable temperature (around 25-40 watts) is key for component replacement on PCBs. Use lead-free solder for safety and compliance with modern standards.
- Desoldering Tools: A desoldering pump or wick helps remove old solder when replacing components.
- Multimeter: This tool measures voltage, current, and resistance, helping you diagnose issues like short circuits or broken traces.
- Magnifying Glass or Microscope: PCBs often have tiny components and traces, so magnification is essential for detailed work.
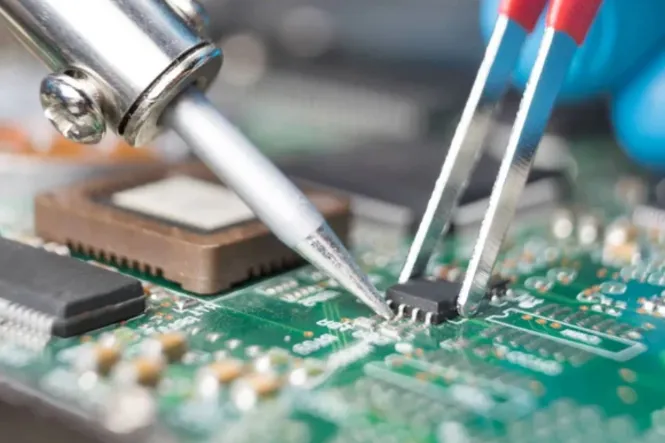
- Tweezers and Small Screwdrivers: Precision tools are necessary for handling small components and accessing tight spaces.
- Isopropyl Alcohol and Brushes: These are used for cleaning the PCB after repairs to remove flux residue or contaminants.
- Replacement Components: Keep a stock of common components like resistors, capacitors, and diodes, ideally matching the specifications of the originals (e.g., a 1kΩ resistor or a 10μF capacitor).
Investing in quality tools can make the repair process smoother and more effective. With these in hand, you’re ready to tackle most PCB issues and extend the PCB lifespan significantly.
Step-by-Step PCB Repair Guide
Now that you have the tools and a basic understanding of common issues, let’s walk through a detailed process for fixing broken PCBs. Follow these steps for most standard repairs:
Step 1: Safety First
Always disconnect the PCB from any power source before starting repairs. Working on a live circuit can lead to electric shock or further damage. If the board handles high voltages, ensure it’s fully discharged by checking with a multimeter (voltage should read 0V).
Step 2: Visual Inspection
Examine the PCB under good lighting with a magnifying glass. Look for burnt components, broken traces, lifted pads, or signs of corrosion. Mark any problem areas with a small piece of tape or a marker for easy reference.
Step 3: Test for Continuity
Use a multimeter in continuity mode to check if traces are intact. Place the probes on either end of a trace; a beep indicates a good connection, while silence means a break. For short circuits, test between adjacent traces—if there’s a beep where there shouldn’t be, you’ve found a short.
Step 4: Repair Broken Traces
If a trace is broken, you can fix it by soldering a small jumper wire across the gap. Scrape off the protective coating (solder mask) on either side of the break to expose the copper, then solder a thin wire (e.g., 30 AWG) to reconnect the trace. Ensure the wire doesn’t touch other traces to avoid shorts.
Step 5: Component Replacement on PCB
For damaged components, first remove the old part using a desoldering pump or wick. Heat the solder joints with your soldering iron (set to around 300°C for most components) and suck away the molten solder. Once the component is free, clean the area with isopropyl alcohol. Then, place the new component, aligning it with the pads, and solder it in place. Double-check polarity for components like capacitors or diodes to avoid reverse installation.
Step 6: Fix Lifted Pads
If a pad has lifted, you can often glue it back down using a small dab of epoxy, then reinforce the connection with a jumper wire soldered to the nearest intact trace. This ensures the component remains electrically connected.
Step 7: Clean and Test
After repairs, clean the PCB with isopropyl alcohol and a brush to remove flux residue. Let it dry completely, then reconnect it to power and test the device. Use a multimeter to verify voltages at key points (e.g., ensure a 5V rail reads close to 5V, within a 5% tolerance) to confirm the repair worked.
By following these steps, you can address a wide range of issues and successfully complete DIY electronics repair projects, ultimately extending the PCB lifespan.
Related Reading: PCB Trace Repair for Beginners: A Hobbyist's Guide to Saving Damaged Boards
Tips for Preventing PCB Damage and Extending PCB Lifespan
While knowing how to repair a PCB is valuable, preventing damage in the first place is even better. Here are some practical tips to help extend the lifespan of your PCBs:
- Protect Against Overheating: Ensure proper ventilation for devices to prevent components from overheating. Use heat sinks or fans if necessary, especially for high-power components dissipating more than 1W of heat.
- Use Surge Protection: Power surges can fry components. Install surge protectors or voltage regulators to maintain a stable input (e.g., 12V ±10% for many boards).
- Keep PCBs Clean and Dry: Store PCBs in a dry, dust-free environment to avoid corrosion. If a board gets wet, dry it thoroughly with compressed air or a low-heat setting (under 50°C) before use.
- Handle with Care: Avoid excessive mechanical stress when installing or removing PCBs. Use anti-static wrist straps to prevent electrostatic discharge (ESD), which can damage sensitive components with as little as 100V of static charge.
- Regular Maintenance: Periodically inspect PCBs for signs of wear or corrosion, especially in humid environments. Clean them gently with isopropyl alcohol every 6-12 months to remove dust buildup.
Implementing these habits can drastically reduce the need for repairs and keep your electronics running smoothly for years.
Knowing When to Repair vs. Replace
While repairing is often the better choice, there are times when replacement is more practical. If a PCB has extensive damage—such as multiple broken traces across large areas, severe corrosion, or a cracked board—it may be beyond repair. Additionally, if the cost of replacement components and time spent on repairs exceeds the price of a new board, replacement might make more sense. For instance, repairing a board with a damaged multilayer structure (common in boards with 4 or more layers) can be nearly impossible without specialized equipment.
However, for most minor to moderate issues, following a solid PCB repair guide like this one can save you significant time and money. Always weigh the complexity of the repair against the value of the device and the availability of a replacement.
Conclusion: Empowering Yourself with PCB Repair Skills
Repairing instead of replacing your PCBs is a smart, sustainable choice that can save you money while reducing electronic waste. By mastering the art of fixing broken PCBs, performing component replacement on PCBs, and adopting preventive measures, you can significantly extend PCB lifespan. This guide has provided a detailed roadmap for DIY electronics repair, from identifying common issues to executing precise repairs with the right tools.
Whether you’re a hobbyist or a professional, these skills empower you to tackle electronics challenges with confidence. Start small with simple repairs, build your toolkit, and soon you’ll be reviving even the most stubborn boards. With practice, PCB repair becomes not just a necessity, but a rewarding skill that keeps your devices—and your budget—in top shape.


