ALLPCB


If you're searching for the best way to clean a PCB after rework, you're in the right place. Post-rework cleaning is crucial to ensure your printed circuit board (PCB) performs reliably and lasts longer. After soldering or desoldering components, residues like flux, solder paste, or contaminants can remain on the board, potentially causing corrosion, short circuits, or signal interference. The most effective cleaning method often involves using isopropyl alcohol (IPA, 90% or higher) with a soft brush to gently remove residues, followed by thorough drying. For tougher residues, specialized solvents or ultrasonic cleaning might be necessary.
In this comprehensive guide, we'll dive deep into PCB cleaning methods after rework, explore the best rework cleaning solvents, and share residue removal techniques to help you achieve a spotless and functional board. Whether you're an experienced engineer or a hobbyist, this guide will equip you with practical tips and detailed steps to master post-rework cleaning.
Why Cleaning PCBs After Rework Matters
Reworking a PCB—whether you're replacing components, fixing solder joints, or correcting errors—often leaves behind unwanted residues. Flux, a common material used in soldering, helps improve solder flow but can leave sticky or corrosive remnants if not cleaned. Other contaminants, like dust or oils from handling, can also settle on the board during rework. If left uncleaned, these residues can:
- Cause electrical shorts by creating unintended conductive paths.
- Lead to corrosion over time, especially with water-soluble or rosin-based flux residues (which can absorb moisture).
- Interfere with signal integrity, potentially causing noise or data loss in high-frequency circuits (e.g., above 1 GHz).
- Reduce the lifespan of the PCB and its components.
Cleaning after rework isn't just about aesthetics; it's a critical step to ensure the board operates as intended. A clean PCB can maintain impedance values within tight tolerances (e.g., ±10% for controlled impedance designs) and prevent unexpected failures in critical applications like medical devices or aerospace systems.

Common Residues After PCB Rework and Their Challenges
Understanding the type of residue on your PCB is the first step to choosing the right cleaning method. Here are the most common residues encountered after rework:
- Rosin Flux Residue: Often used in soldering, rosin flux leaves a brownish, sticky residue. While non-conductive when dry, it can become conductive if exposed to moisture, leading to potential shorts.
- No-Clean Flux Residue: Designed to be left on the board, no-clean flux can still cause issues in high-reliability applications or if rework disturbs the residue, exposing active components.
- Water-Soluble Flux Residue: This type of flux is highly corrosive if not cleaned properly, as it can absorb moisture and create conductive paths.
- Solder Paste Remnants: Leftover solder paste can create tiny conductive particles, risking shorts between closely spaced components (e.g., in fine-pitch designs with 0.5 mm spacing).
- Dust and Oils: Handling the PCB during rework can introduce fingerprints or dust, which may trap moisture or interfere with conformal coating adhesion.
Each residue type requires a tailored approach for removal, as using the wrong solvent or method can damage components or the PCB itself.
Best Ways to Clean PCB After Rework: Step-by-Step Methods
Let's explore the most effective PCB cleaning methods after rework. These techniques range from simple manual cleaning to advanced processes, depending on the complexity of your board and the residues present.
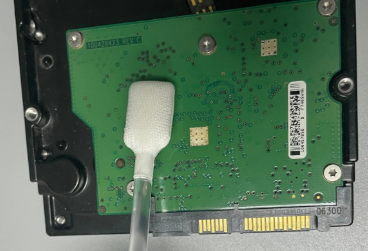
1. Manual Cleaning with Isopropyl Alcohol (IPA)
Manual cleaning with isopropyl alcohol is often the best way to clean a PCB after rework for small-scale projects or hobbyists. IPA (90% or higher concentration) is widely available, affordable, and effective at dissolving flux residues.
Steps:
- Gather your tools: 90%+ IPA, a soft-bristled brush (like a toothbrush), lint-free wipes, and compressed air.
- Power off and disconnect the PCB from any power source to avoid electrical hazards.
- Dip the brush in IPA and gently scrub the areas with residue, focusing on solder joints and reworked sections.
- Use a lint-free wipe soaked in IPA to clean larger areas or remove excess liquid.
- Blow away remaining debris or liquid with compressed air.
- Allow the PCB to air dry completely (typically 10-15 minutes) before powering on.
Tip: For densely populated boards, use a small syringe to apply IPA precisely, avoiding sensitive components like connectors or capacitors that might retain liquid.
2. Ultrasonic Cleaning for Deep Residue Removal
For boards with stubborn residues or complex geometries, ultrasonic cleaning is a powerful residue removal technique. This method uses high-frequency sound waves (typically 20-40 kHz) in a liquid solution to dislodge contaminants from hard-to-reach areas.
Steps:
- Prepare a solution of distilled water and a small amount of PCB-safe detergent or IPA (check the cleaner's specifications for the correct ratio, often 10:1).
- Place the PCB in the ultrasonic cleaner basket, ensuring it’s fully submerged but not touching the tank bottom.
- Run the cleaner for 3-5 minutes, depending on residue severity. Avoid longer cycles to prevent component damage.
- Rinse the PCB with distilled water to remove any remaining cleaning solution.
- Dry thoroughly using compressed air or a low-heat oven (around 60°C for 30 minutes).
Caution: Remove sensitive components like MEMS sensors or crystals before ultrasonic cleaning, as vibrations can damage them. Always check the PCB and component datasheets for compatibility.
3. Using Specialized Rework Cleaning Solvents
For specific residues like hardened rosin or no-clean flux, standard IPA might not be enough. Specialized rework cleaning solvents are formulated to tackle tough residues without harming the PCB or components.
Common Solvents:
- Flux Removers: These are designed specifically for flux residues and often come in aerosol cans for easy application.
- Deionized Water: Ideal for water-soluble flux, but must be followed by thorough drying to prevent moisture-related issues.
- Solvent Blends: Some blends combine hydrocarbons and alcohols for broader residue removal, suitable for mixed flux types.
Application Tip: Use a small brush or cotton swab to apply the solvent to targeted areas. Always work in a well-ventilated area and wear gloves to avoid skin contact with chemicals.
Residue Removal Techniques: Tips for Success
Beyond choosing the right method or solvent, how you approach cleaning can make a big difference. Here are some proven residue removal techniques to ensure a clean PCB after rework:
- Work in Small Sections: Focus on one area at a time to avoid spreading residues or missing spots. For example, clean around a single IC before moving to the next.
- Use Anti-Static Tools: Always use anti-static brushes or wipes to prevent electrostatic discharge (ESD), which can damage sensitive components like MOSFETs or microcontrollers.
- Inspect Under Magnification: After cleaning, use a magnifying glass or microscope to check for remaining residues, especially in tight spaces with pitches below 0.8 mm.
- Test for Residue Conductivity: For critical applications, use a multimeter to test for unintended conductivity between pads or traces after cleaning. Ideal resistance should be in the megaohm range (e.g., >10 MΩ).

Safety and Best Practices for PCB Cleaning After Rework
Cleaning a PCB isn't just about removing residues; it's also about protecting the board, components, and yourself. Follow these best practices to ensure safe and effective cleaning:
- Always Disconnect Power: Never clean a PCB while it's powered on to avoid shorts or personal injury.
- Wear Protective Gear: Use gloves and safety glasses when handling solvents to protect your skin and eyes.
- Avoid Over-Cleaning: Excessive scrubbing or solvent use can damage solder masks or lift traces, especially on thin boards (e.g., 0.8 mm thickness).
- Dispose of Waste Properly: Used solvents and wipes should be disposed of according to local regulations, as they may be hazardous.
Choosing the Right Cleaning Method for Your PCB
Not every PCB or rework scenario requires the same cleaning approach. Consider these factors when deciding on the best way to clean a PCB after rework:
- Board Complexity: Simple boards with few components can often be cleaned manually, while densely populated boards may need ultrasonic cleaning.
- Residue Type: Match the solvent to the residue—IPA for general flux, specialized removers for tough residues, or water for water-soluble flux.
- Application Requirements: High-reliability boards for aerospace or medical use may require stricter cleaning standards and testing post-cleaning.
Common Mistakes to Avoid During Post-Rework Cleaning
Even with the right tools and solvents, mistakes can lead to damaged boards or incomplete cleaning. Watch out for these pitfalls:
- Using Low-Concentration IPA: IPA below 90% contains too much water, which can leave moisture on the board and cause corrosion.
- Skipping Drying: Failing to dry the PCB completely can trap moisture under components, leading to failures over time.
- Using Abrasive Tools: Hard brushes or scouring pads can scratch the solder mask or damage delicate traces.
- Ignoring Component Sensitivity: Some components, like LEDs or sensors, can be damaged by solvents or ultrasonic waves—always check datasheets.
Conclusion: Achieving a Spotless PCB After Rework
Mastering post-rework PCB cleaning is essential for ensuring the reliability and performance of your circuit boards. Whether you opt for manual cleaning with isopropyl alcohol, advanced ultrasonic methods, or specialized rework cleaning solvents, the key is to match the technique to the residue type and board requirements. By following the steps and residue removal techniques outlined in this guide, you can effectively clean your PCB after rework and avoid common issues like corrosion or signal interference.
Remember to prioritize safety, use the right tools, and inspect your work carefully. A clean PCB not only looks professional but also performs at its best, maintaining signal integrity and extending the lifespan of your project. With these PCB cleaning methods after rework, you're well on your way to achieving flawless results every time.